
They say ‘Imitation is the sincerest form of flattery.’ If you’ve come across a fairly unique guitar that you would like to copy and build for yourself, you probably wondered how you can go about achieving that. Before starting to build any guitar there are a few details you need to know or decide and they are of course somewhat different for each guitar make and model. For many models, you can grab the details from either the manufacturer’s website or the seller, but in many cases, you will only have partial information and you will need to fill the blanks.
So how do you copy a design?
You can copy any design by following the next few steps
- Get a clear front view image of the guitar.
- Find out, or decide on the scale length of the guitar.
- Create a full-size graphic document, which will become your blue-print for the guitar
- Scale the image to match the full-scale image
- Trace the guitar parts while checking and using actual size and measurement, of the parts and components.
- Print it out at full scale to make a template.
The Process of planning the guitar
This can be a bit of a tedious process although I find that there is a lot of fun, as in these stages there are no limitations and you can imagine anything you want. In this post I will break it down to manageable steps and go through the little details.
Deciding on a guitar you want to copy
P Type, LP type and S-Type are very common name of copies of some of our favorite guitars, and matching plans or templates can be found or bought in numerous places. But every now and then, you will find an original shape or design, you just fancy. Regardless of the style, you should be able to turn that image you saw on Pinterest into an actual template you can start working with.
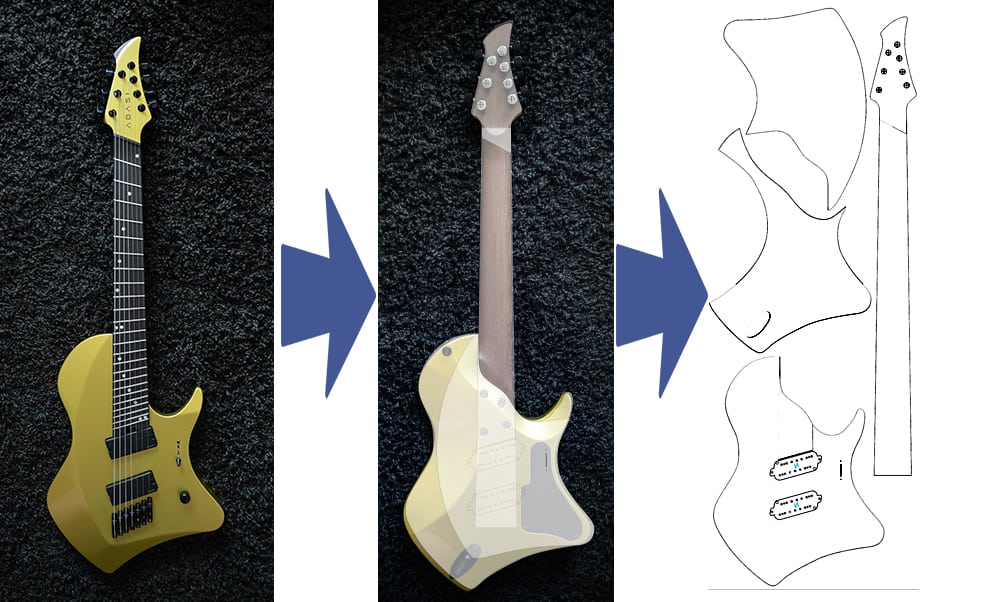
I’ve lately had my eye on the Abasi line of guitars by Tosin Abasi. This guitar has a few of the less standard features I wanted to incorporate in my next guitar and I also love the shape. There is also nothing standard bout any of the parts. It’s a 7 string, fanned fretted design with a uniquely ergonomic body, so everything is going to have to be custom made or tailored for it.
Making your checklist
Once you decide on the guitar you need there are many parts and details you will need to figure out and decide on, including all the hardware and parts you will need to purchase. I lay out in great detail in “All You Need to Know to Build Your First Electric Guitar”
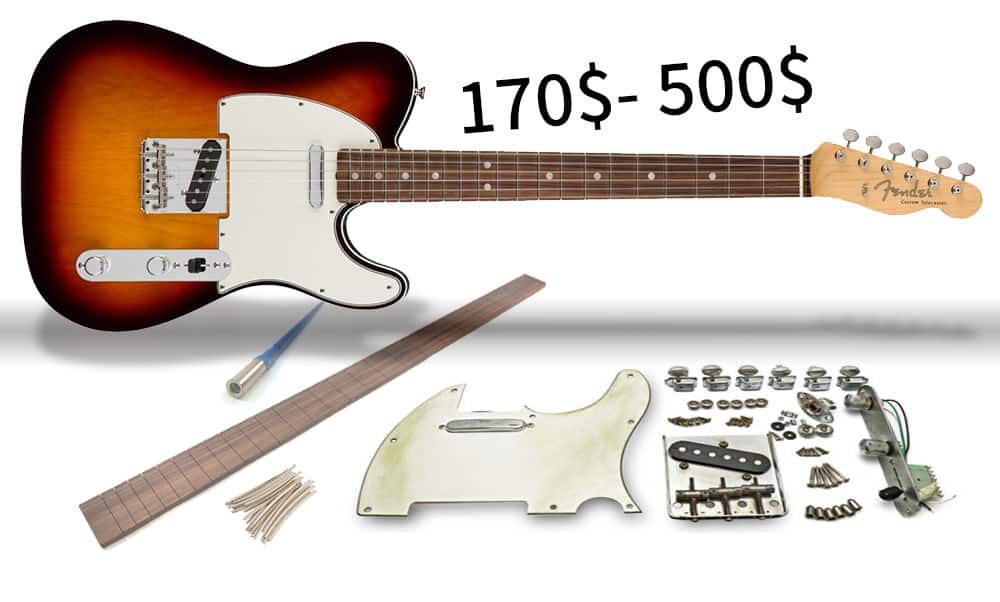
Once you have the list you can do some shopping. I have already ordered all the hardware I will need for this guitar, well actually a budget version, and you can see the process for that in a video https://youtu.be/INUCoQ5JQQQ

It is always good to have the actual hardware you are going to use before you start cutting, as there are often slight variations between years and models, even if you are using original parts, which in this case may not even be available.
Having good reference
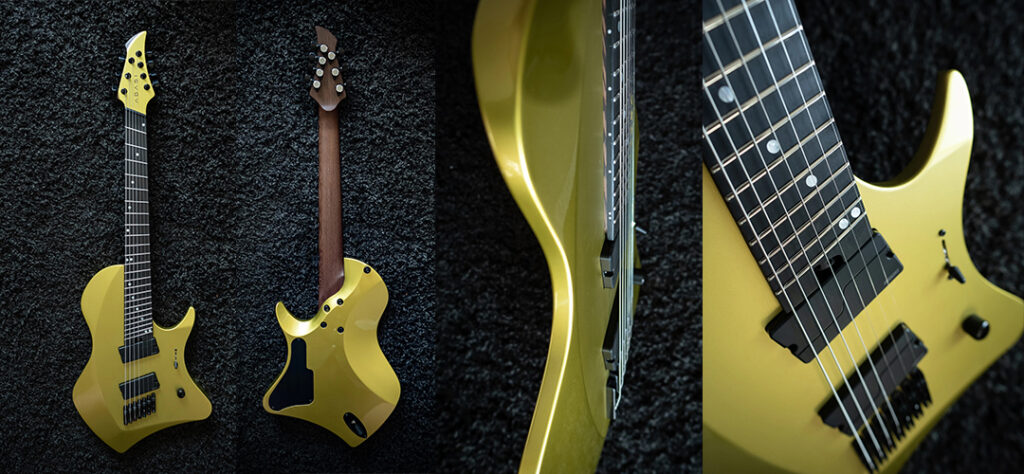
You are going to need to find some good images of the guitar. In absence of actual plans or accurate measurements, the better the images, the closer you will hit the right shape and size. Aside from the front view, the more images you can find of various angles will also help in planning and executing the build. Other reference will include measurements of scale length, neck width at the nut, neck thickness and any other details you can gather.
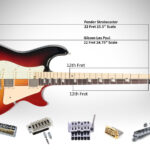
I know that this guitar has a multiscale length of 25.5” at the high E string and 27.5” at the Lower E String
Graphic Software
In order to draw the blueprints, you will need some kind of graphic software, preferably with vector capabilities and the ability to reach good accuracy. You will also need the software to have the option of exporting PDF format so you will be able to print out your plans in full size. If your computer is connected to a plotter, it will even be easier.
I will be using Photoshop and it is definitely not the only one to use, in fact Illustrator or other vector-based programs may even be better suited for the task. There are plenty of alternative and free apps.
Setting Up the plans
I will set up a fairly large document and using 300 dpi, to get better printing quality. You can use lower resolution (Screen resolution is 72 dpi, but is too low for printing)) but the print out will give you jagged lines. This is still something you could work with but it will not be as accurate to follow and trace. My document is 1100mm by 400mm. That’s about 43” 16”. This is a fairly large document where the images you will bring from the internet will probably look tiny and will blur a little when scaled up. That’s OK, we are just using them for reference. I am working with metric measurements, I figured if it’s good enough for Nasa, it’s alright for me. I will try and give Imperial references, but when we get to the little things, it’s going to get metric. The principles are the same regardless.
A few graphic Tips
- This is not meant to be a graphics tutorial but making better use of your tools will help the process:
- Set your rulers to the units you will be building in, be it millimeters or inches.
- Use guides or other visual cues for accurate measurements, if your program doesn’t have actual measuring tools.
- Try and use layers, masks and other non-destructive methods, so you can go back and make adjustments, as much as possible.
Setting up the correct proportions
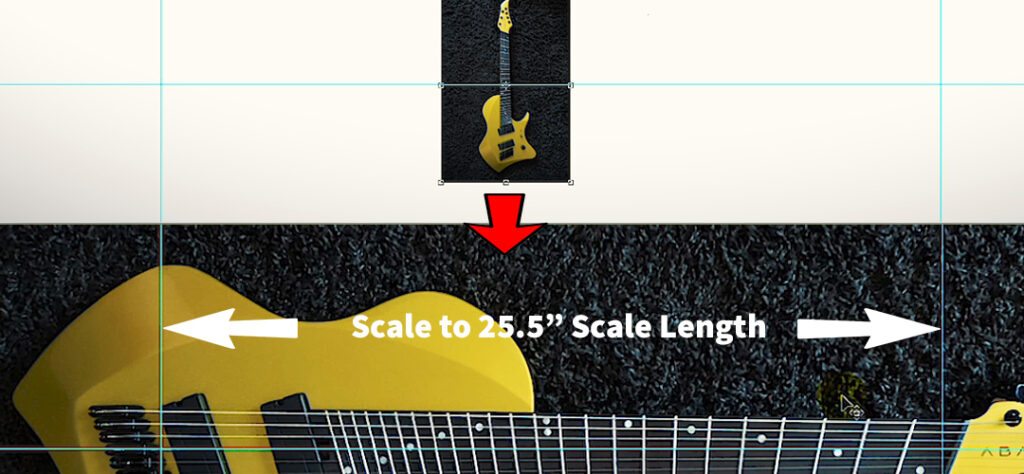
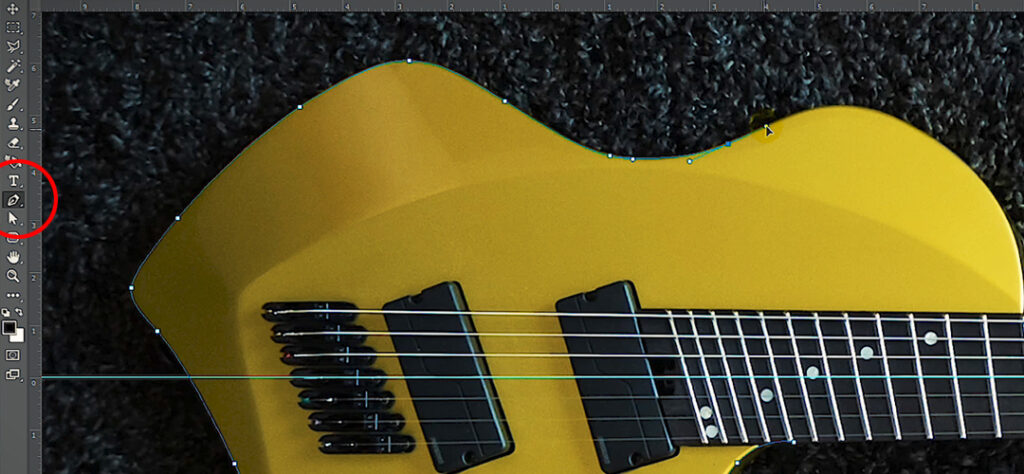
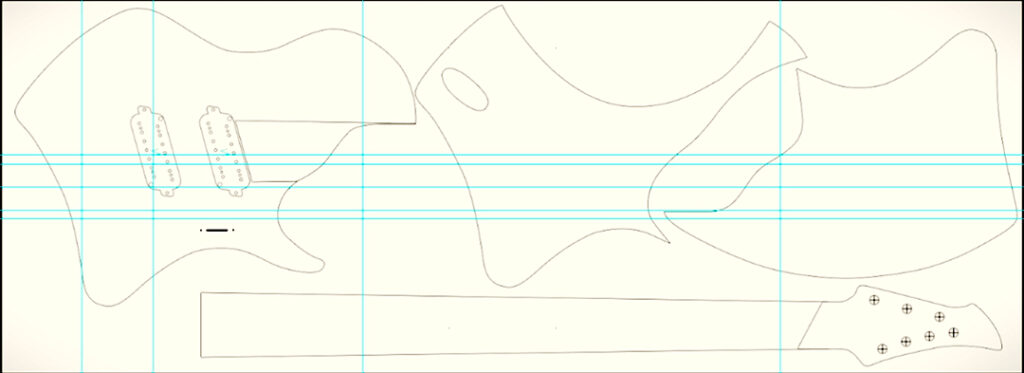
The first thing I do is put my centerline as a guide. The next step will be to scale the image to the correct proportions of the file, so when I draw the plans they will be in real size. I will set one guide to be at the Zero point and where I will put the bridge for the high E string will be. I know that my high E string will have a 25.5” scale length, so I will use this as the proportion for scaling the image. This is a multiscale guitar, but the same steps will work for a ‘normal’ fretboard’. I add another guide at the 25.5” point and start scaling the image until I eyeball the bridge to the left guide and the nut at the right guide. I also give a slight rotation to try and align the 4th and middle string to the centerline. In a 6 string, the centerline will sit between the third and fourth strings. This whole process will be easier the better the quality of the photo and the higher the resolution. You have to take into account that accuracy is not going to be perfect here, as the photograph is not always exactly facing the guitar, and even if so like this one, there is always a bit of lens distortion. We are using the photo to get as close as we can and we will measure and correct it later and finally on the template itself. If you know the exact size of the body you can use that as well, but I figure a few millimeters difference to the shape of the body, wouldn’t make a difference.
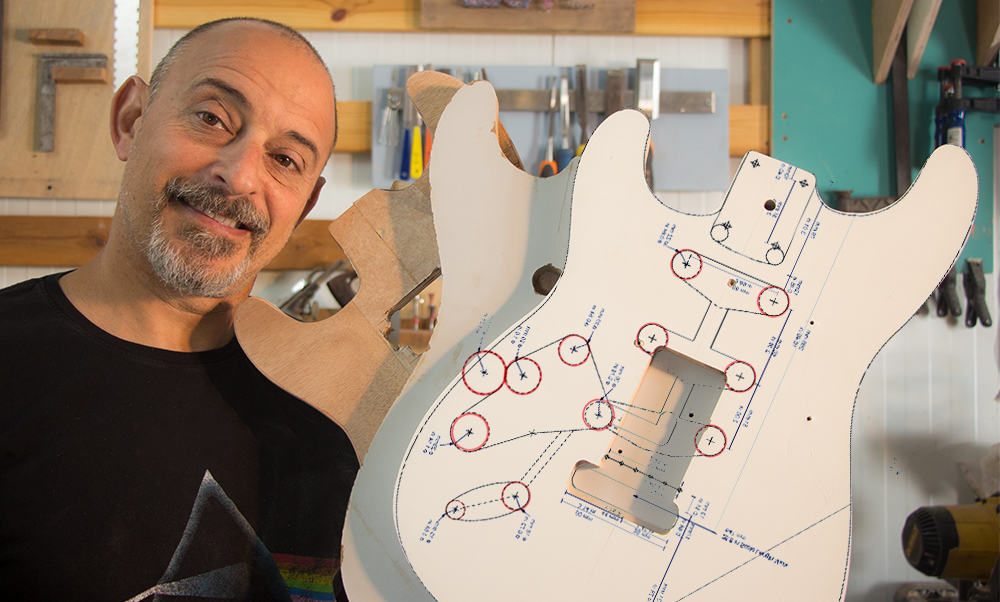
Tracing the shape of the guitar
Once I am happy with the position, I use the pen tool and start tracing the contour of the body. The pen tool will give me the combination of very smooth lines and corners while being able to easily make changes and adjustments at any time. This will be the number one tool for tracing and is one of the essential
ols of any vector-based program. It works slightly differently in different applications but should enable, adding control points, removing control points, and manipulating the handles to control the angle and the length of the tangents.
Working out hidden details
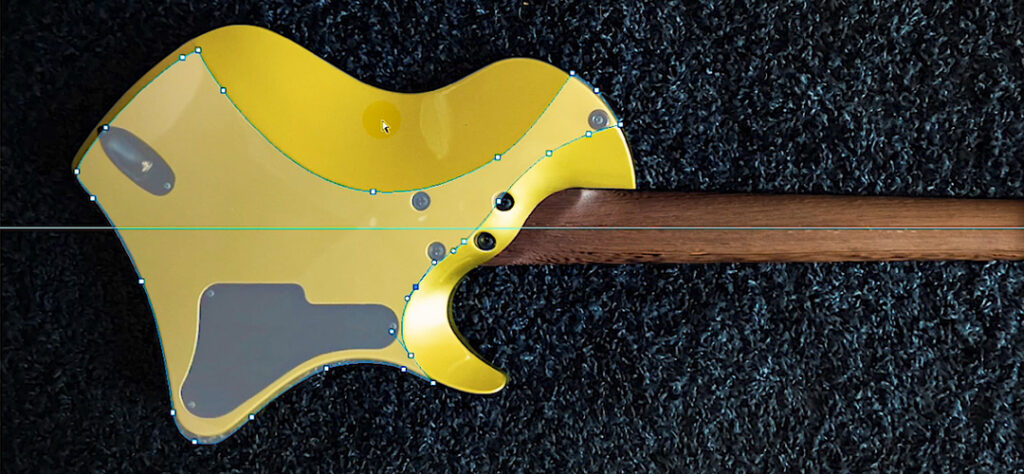
To find the shape of the body behind the neck I will bring in the photo of the back. I will flip it and scale it to match the size of the frontal image. Due to the difference in angle, the photos will not exactly match, and I have to commit to one of them or do some kind of average. I will stay with the shape I drew off the front Photo and just align the neck pocket area so I can trace it and finish the missing area. I go over the contour again to smooth it out and finalize the shape. After the line drawn I will either create a vector shape, or save it as a vector Mask, depending on your software of choice, and give it a black outline of a few pixels.
Tracing the secondary templates
I will now create the outline for all the contours of the parts which will be removed and angled. Since there is a portion of the body which will stay the same, I will just duplicate the front and start adjusting the control points. I will be removing points, moving them and changing the handles length, until the correct shape is reached. If I was planning building multiple guitars with this shape, I would create a template out of it, but for a single instrument this will probably just be printed and traced. This part will be shaped manuly and I am not going to use a router for it anyway.
Tracing the back
The next outline I am going to trace are the corresponding shapes on the back. For many guitars there is no difference between th outline of the front and the back, so the difference will mostly be the details. Again I will duplicate the front outline and use that as my starting point. I will not ‘correct’ the differences between the front and back outline but just add in the more internal shapes, so I can later trace them to the back and carve them away. I remove or add control point where needed and stretch handles I reach the required shape.
Adding the details and Parts
Now that the main body shapes are there, I can go back and start putting the little details in. This part will look very different for every guitar. Your parts may be mounted on a pickguard like most Fenders or mounted on the body itself. The controls may be installed from the back with a cover. You may have a tremolo, a hard-tail, or single-string bridges as I do. The neck may be glued bolted or a though neck. The process, however, is quite similar, and other than positioning the parts and components, the ones to look out for are the ones that will need routing or any other form of shaping, whether in the front or the back.
The unique Jack
I start with the jack socket plate. Whenever possible I would prefer to use the measurement of the actual hardware I am going to be using. I jump over to the product page and look for the actual product size. The plug and plate are similar to a Strat. I copy the image and paste it. Next, I will use guides to scale the image into the correct size. I will then trace the area I will want to rout out and create an outline for it. This is not a very standard position for the plug so keep in mind the depth when routing… There is an arm contour on the other side and you do not want to go through…
The neck screws
The screws for bolting on the neck are next. I mark 5mm circles. I also make a little X for the center, as this is what we actually need for both the hole itself and the indent we will give it. I may shift the position slightly later after I have finalized the neck pocket itself. The final size of the whole and the indent for sinking the screw will be determined with the final hardware, but the center point is what really matters here. This will be similar in process for any bolt-on neck, whether there is a back-plate or not.
The back cover is up.
I am not sure I will use it in it’s current shape, but It’s easier to trace it now and have it printed just in case. I trace it in the same way as I did the outlines and save it as a vector mask, I will be able to later revisit should I want to.
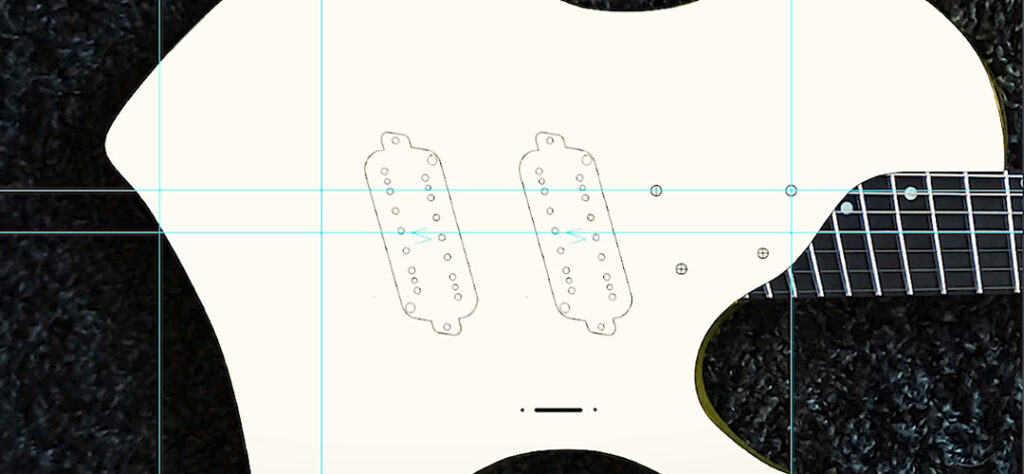
The Pickups
Going back to the front I will mark the position of the three way switch so I know it matches the panel at the back. Then I turn to the pickups. Here again I try to look for the Specks of the actual pickups I have ordered and not original Fishman Fluence. I find something similar, Import the drawings, and scale them to the correct proportions. I position them in an angle so the magnets best fit the strings position and they also correlate with the 24th fret and the bridge.
The neck size and shape
Now that we have all the major components, its time to figure out the neck pocket, and for that we need the neck. I will still use the image for the headstock shape, but I need the actual measurements of the neck. The nut I ordered is 51mm wide, remember this is a 7 String, and I have looked at some 7 string bridges and decided to go with 63mm between the strings which will work out to be 69.4mm. If You have a more standard neck you can easily find the measurement at the nut and heal or bridge at the manufacturer’s website, the tolerance isn’t huge and you can always go with one of your favorite brands.
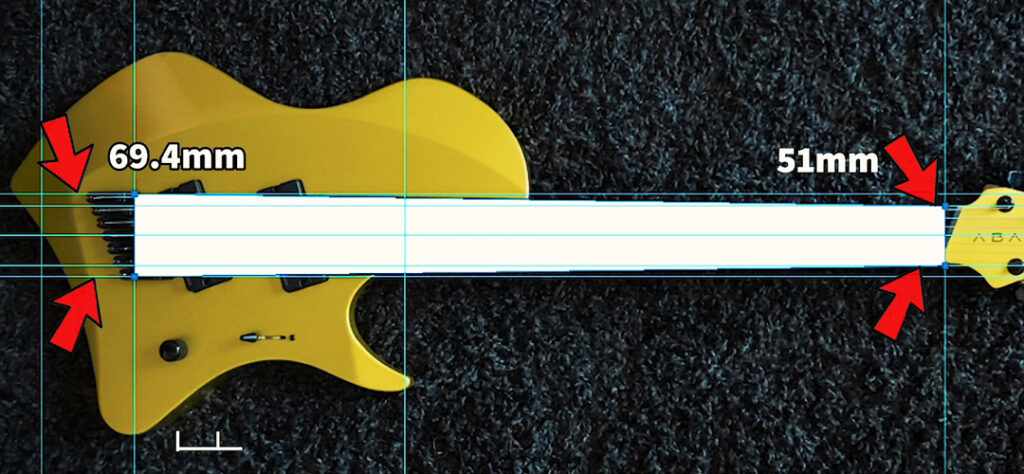
I will put one vertical guide at the nut, on the centerline, and another on the bridge and then put two guides with a total of 51 millimeters at the nut, and two spaced 69.4 mm at the bridge. This way I can easily draw a large rectangle which will snap to my guides and give the exact width of the neck as if ran all the way to the bridge. To get the neck pocket, I can duplicate this shape and just trim it to where the neck pickup is on one side and then to the shape of the body on the other. A couple more control points, a little stretching and maneuvering of the handles and we have our neck pocket.
The headstock
Last and not least is the headstock. I will start tracing it with the pen tool. I can see that my neck is a bit wider than the picture, So I will wiggle into it. As I did with the screws for the neck, I will mark the position of the tuners with a 10mm circle, which is what my tuners actually need, if I recall correctly, but mark the center with an X, as that is the starting point for drilling. I do like to check that the actual tuners can all actually fit together in the back of the headstock before drilling, but that will happen later.
Verifying the measurements
I do like to go over all the measurement once I have all the hardware, and have made all the final decisions, but once that’s done all we still need to do is place all the parts side by side for printing and these plans are done.
Printing The Guitar Plans
You will need to print them in full size, so make sure ‘scale to fit’ is not on when printing. If you don’t have access to a plotter you can use the ‘Poster’ option in the PDF print options. This will print a tiled version which you will have to match and paste together. Turning the ‘Cut-Marks‘ option on will make the connection easier.
That’s it. You are now ready to make your templates and get started with building the guitar. For much more on making templates see ‘Electric Guitar Templates – The complete guide’
Or if you prefer video format: