

The iconic Fender Stratocaster shape is, for many people, synonymous with the term ‘Electric Guitar’. It is no wonder that many of us who aspire to build a guitar themselves will want to use create a Stratocaster.
How to Build a Stratocaster Body
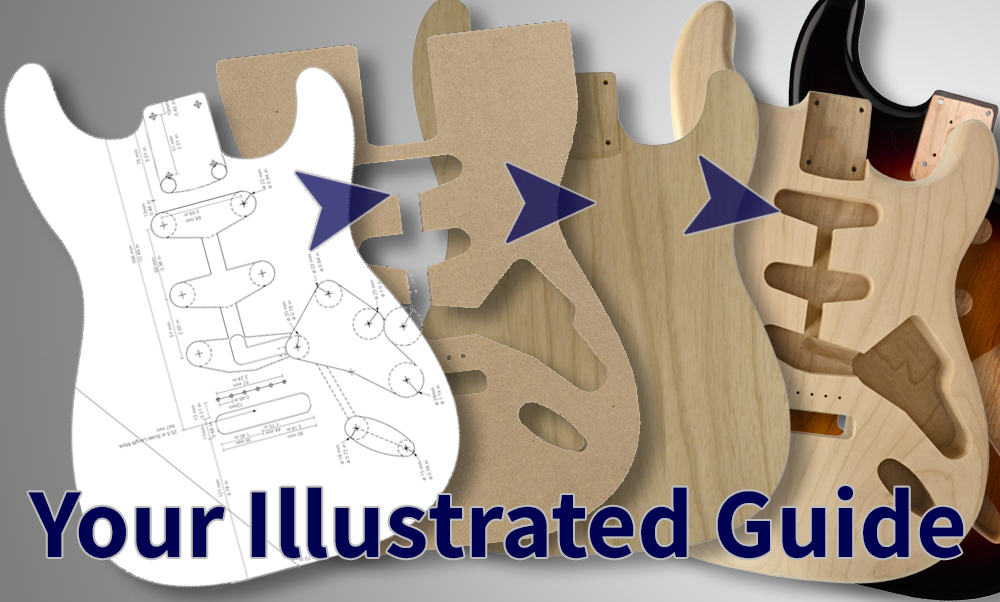
The classic Strat body is a relatively complex piece of timber. With an asymmetrical body, both front and back cavities, rounded corners, and reliefs for comfort. I’ll break it up into a few steps:
- Create your templates
- Prepare the timber
- Glue the body parts
- Rout the front cavities and neck pocket
- Cut the outline shape and Sand it
- Rout the back, tremolo cavity
- Cut/ grind the arm and belly relief
- Round the corners
- Drilling
- Sand and sand.
Before you get started
This guide is meant for beginners and assumes you do not have the full range of tools a professional Luthier may have. There are many ways to achieve the same result. This one is just one of them, but I always try and find the shortest and easiest rout to get there. All the work can be achieved with manual tools but I will be using some basic tools such as a router, a Jig Saw and a drill. I will also give options, alternatives and the pros and cons for different methods.
Create your templates
Templates are a guitar builder’s best friend. A template will ensure the correct shape and measurements and will allow for accurate repetition. When making your own template you may also figure out other issues and mistakes you may not want to run into with the body itself. They are also a good place to make sure all your parts and hardware fit and match the body and take any modifications into account.
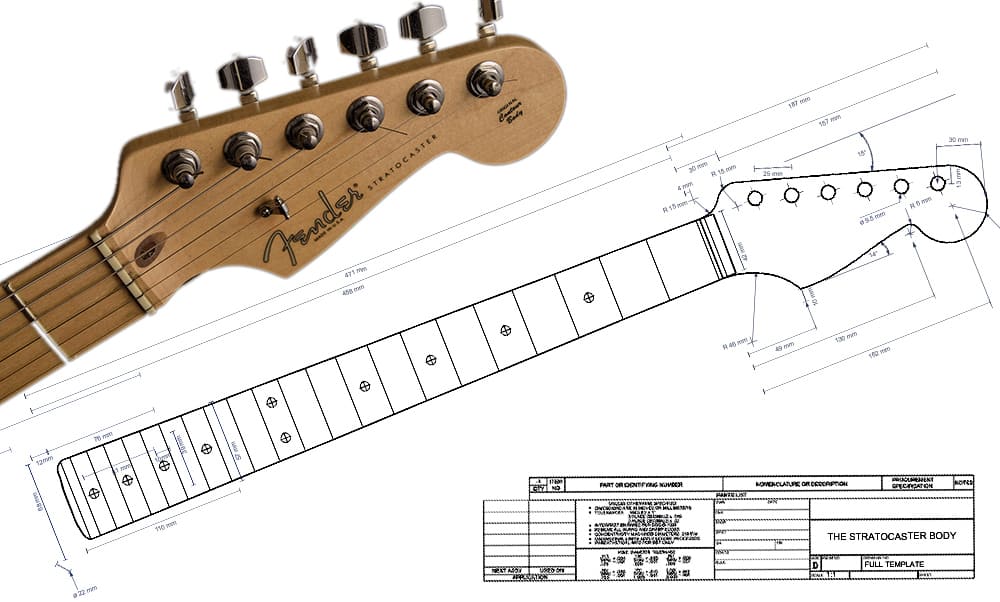
Printing the plans
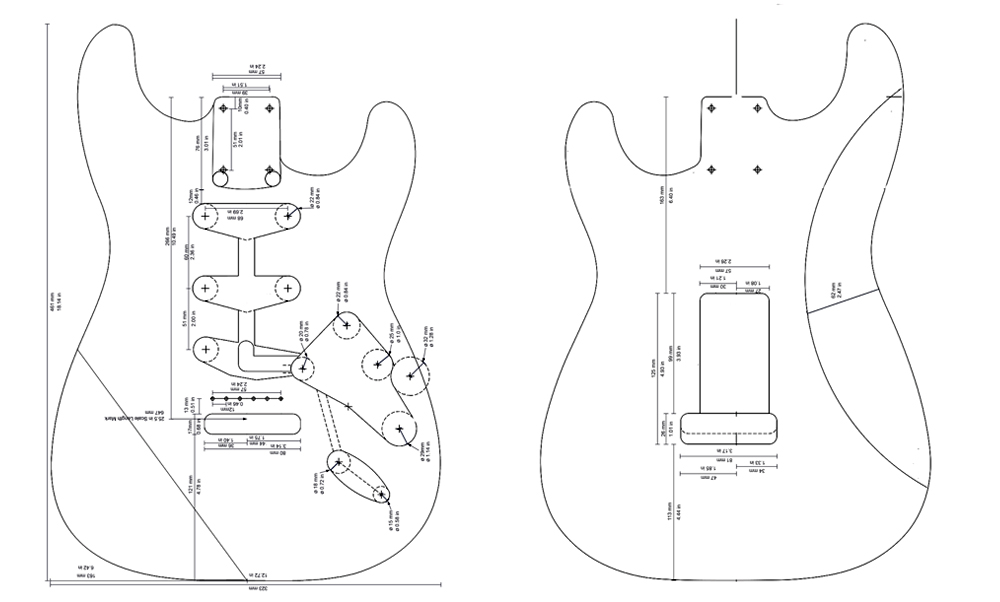
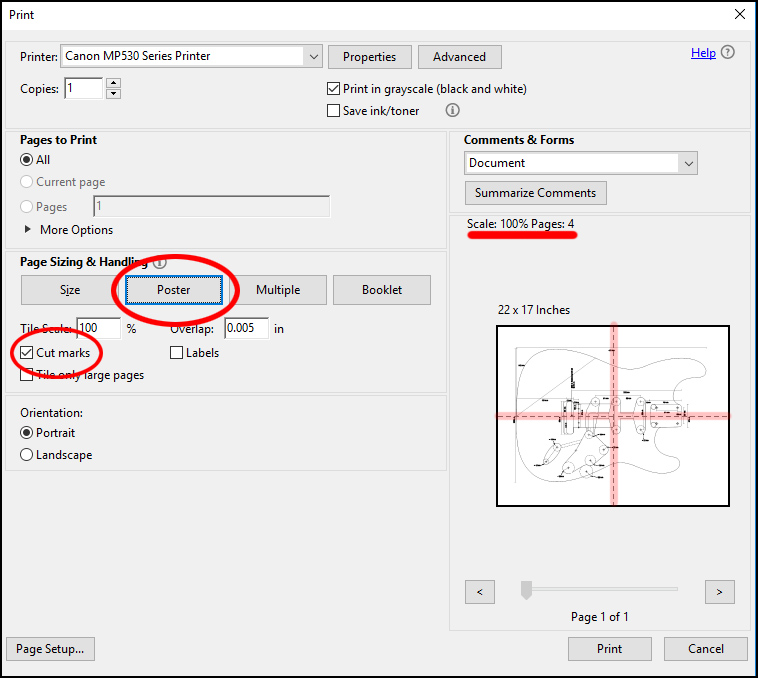
You can find or buy plans (or templates for that matter) in various places and stores. For this guide, I have provided a set of plans which you are welcome to download from the download page and use as you see fit. They come with both metric and imperial units. (so, no excuses) You will need to print them in full size, so make sure ‘scale to fit’ is not on when printing. If you don’t have access to a plotter you can use the ‘Poster’ option in the PDF print options. This will print a tiled version which you will have to match and paste together. Turning the ‘Cut-Marks‘ option on will make the connection easier
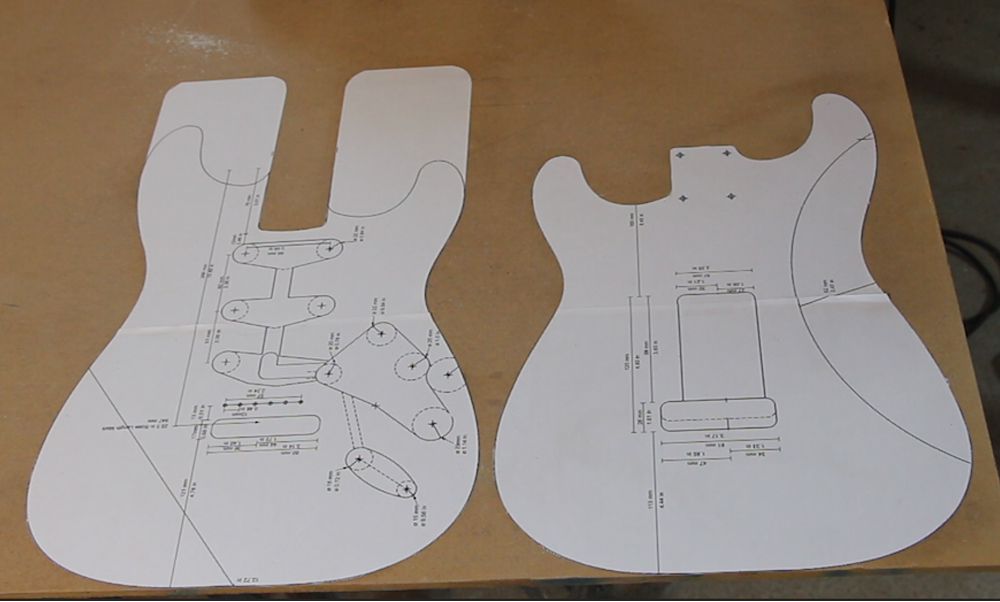
This method will work with any size printer or pages. Obviously the larger they are, the easier it will be. I have printed on A3 pages so it’s just two parts. I always print an extra set of plans, just in case. This may also be handy when we get to the carving the elbow and belly relief.
Two or more Templates
I will be aiming for a standard 60’s body with three single coil pickups, a tremolo system and the standard controllers. Depending on the methods and tools you use you will need at least two templates. One will include the outline and the back cavity for the tremolo system. The other will have the front and will include the cavities of the pickups, the control knobs, the bridge and the neck pocket. The front template will often omit the horns themselves to leave more material and give more stability when routing the neck pocket. On top of these two we will need either extra templates or other jigs to account for different cavities with different depths to route. If you are planning on a hard tail bridge, you may be able to get away with one and add the full outline including the cutouts.
Cutting the templates
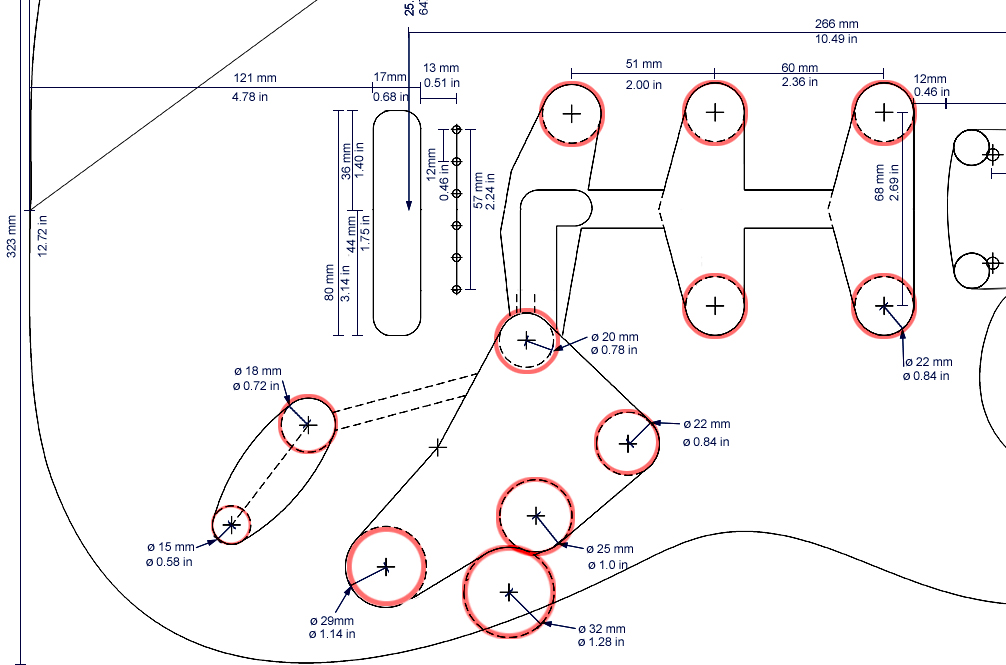
After gluing the plans, cutting them, and tracing or gluing them to the template material, cut it with a jigsaw or a band saw. MDF is usually the material of choice and thickness of 1/4”-3/4” or 8-17mm will all work. Good quality plywood will also do the job, but make sure it is stable and gap-free. Use the saw to cut the outlines as well as the cavities. You may want to drill the sides of the pickup cavities with a 22mm or 0.84” bit to both make a starting point for the saw and to get a ce round radius. Other radii of drills will also be handy for the jack and the control cavities as well as the corners of the bridge and the neck pocket. Most of the radii are shown in the plans.
Sanding and finishing the Templates
After drilling and cutting comes sanding. The template will transfer every little bump or dent to the guitar body so any extra time sanding the soft thin template material will be well worth it and will save you the time of sanding a harder and thicker piece of wood. Use files and sand paper. The only rule here is to try and maintain a straight edge as much as possible. If you are thinking of using these templates in future projects you may want to seal the sides with polyurethane or diluted carpenters glue. You may also want to copy them to another piece of MDF and create a master which will only be used to create more versions of the template and not be used on the body itself.
This is an excellent point to check your hardware and parts and see that they all fit each other and the template. Different makers and different models may have slightly different measurements, so it is always good practice to get all your parts before cutting anything. Make sure your pickups match pickguard, and that they all fit the template and bridge.
Watch more on Templates in my video “Make Your Own Electric Guitar Template“
Prepare the timber
Choosing the wood.
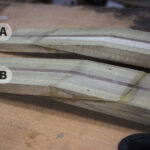
Now that we have the templates it is time to prepare the wood for the body. Most guitars are built from two matching pieces which will together be wide enough to fit the body. However, if you have one piece wide enough or prefer to glue three pieces together, that should be fine. Two or more pieces will give a stronger and more warp resistant result. The two pieces will often be ‘book-matched’ or at least cut from the same piece. This is also considered better looking but ‘beauty is in the eye of the beholder’. I am also going for the standard solid body, with no fancy top or laminate. This method works all types of woods regardless of hardness or tone
Cutting and Planing
Strats are 1.72” or 44.45mm and you should plane them or buy them to this measurement. You will also need to make sure they have a straight edge for better adhesion and to achieve a flat and even surface after the glue is dry. Using a jointer is the preferred method and it should be used on top and one of the sides (before planing) for better results. Check it by pressing the two pieces together and look for gaps in the seam and a flat top.
A ‘poor mans’ alternative to achieving straight edges is to run a router with a ‘straight edge’ and a template copier bit.
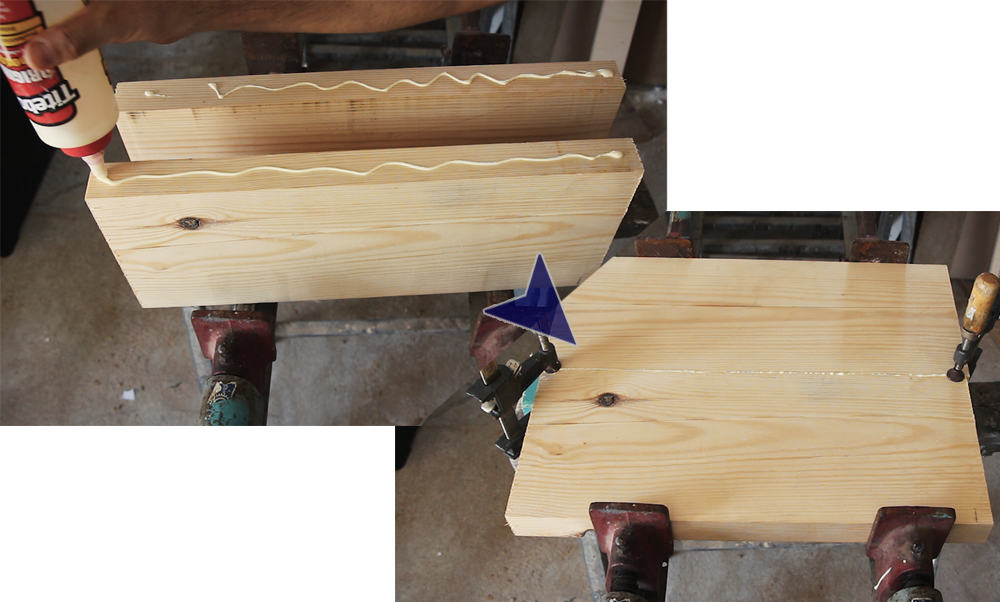
Glue the body parts
Use carpenters’ glue generously and clamp the two parts together. You may also want to clamp them vertically so there is no ‘slippage’ which will create an annoying step. Ideally’ if you have access to a wide enough planer you will want to glue it a bit thicker and run it through after gluing. If you have prepared it carefully you should be able to get away with sanding. Three or four good clamps should be more than enough with wood this thick, as the pressure will be spread evenly. It needs to be tight enough but there is no need to overdo it. If there are even amounts of glue squeezing out, you are good. Clean the glue with a damp cloth, or leave it and scrape when it’s dry. Three hours are enough for most glues but I just leave it overnight.
Routing the front cavities and neck pocket
I always prefer to do as much routing as possible on a larger and flat surface. It makes it easier to work and avoid wobbling. It is now time to mark the center line (the seam if you glued two pieces) on both the template and the body. This will be our reference from now until almost the end of the build, so make sure you always have it.
Marking and removing some material
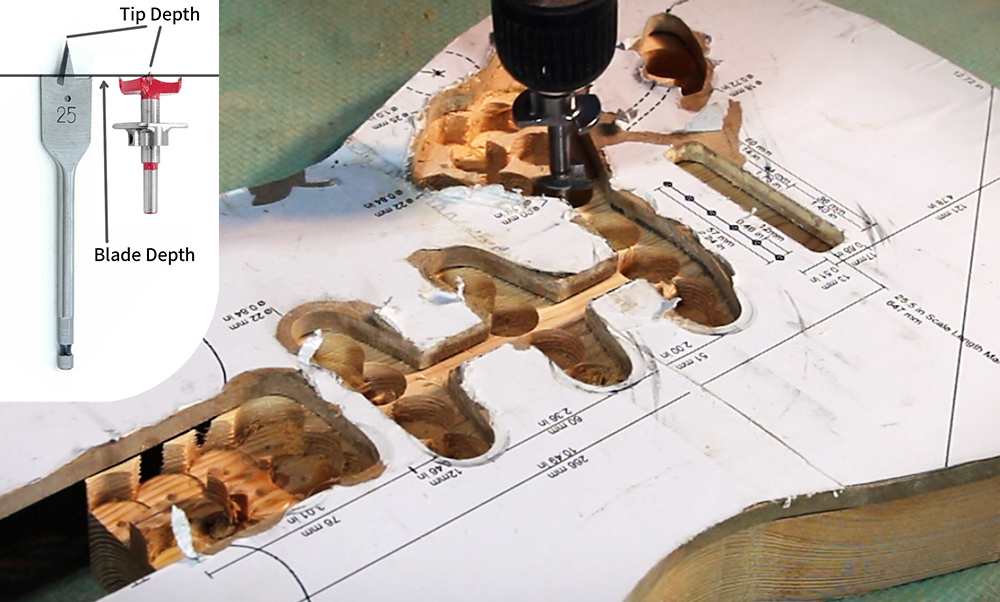
Align the front template to the front of the body and mark the cavities. Before jumping on the body with a router you will want to remove as much material with a drill. We want to leave the router as little work as possible. Ideally here you would want a drill press with a Forstner bit. This will give you the cleanest cut and also help removing the wood chips while working. Just like the template, a bit with the correct radius can give you some very nice and round corners. If you were thinking of investing in a set of Forstner drill bits, this would be a good time (The good ones are not cheap). A hand drill will also do the job, just try and maintain a straight angle and be careful not to slip. ‘Butterfly’ type drills can also help but they tend to give very rough edges and make a deeper center hole. Regardless of the drill used, mark the depth you need and drill a bit less so the router will smooth the bottom afterwards.
Attaching the Template
Routing with a template requires attaching it to the body. At this point you can also just clamp the template in place in a way which will not get in the way of the router, but you can (and will probably have to later) attach it with an adhesive. Good quality double sided tape can be expensive, but some can also leave you frustrated for being too strong, not being strong enough or leaving a lot of glue that is hard to scrape. They can also ruin the MDF if sticking too hard. If you are familiar with it and have one that works for, stick with it. ? Personally, since I have come across Ben Crowe’s ‘Superglue and masking tape trick’, I never touch double sided tape. It is plenty strong, and is easy to remove if you don’t get carried away with the glue.
The ‘Superglue & Masking Tape Trick
Simply attach a strip of masking tape to the body and the template in the same place (or actually opposite) and then superglue them back to back. Just be careful to only have the glue on the masking tape and not the wood or the template. Two or three strips should be more than enough. If you have super glue accelerator spray, the adhesion is almost immediate. Normally just press on it for a bit. Any type of CA glue should work here. Detaching is just pulling the two parts apart and pealing the masking tape. If it’s very hard to detach, you’ve probably been too generous with the glue.
Before the actual Routing
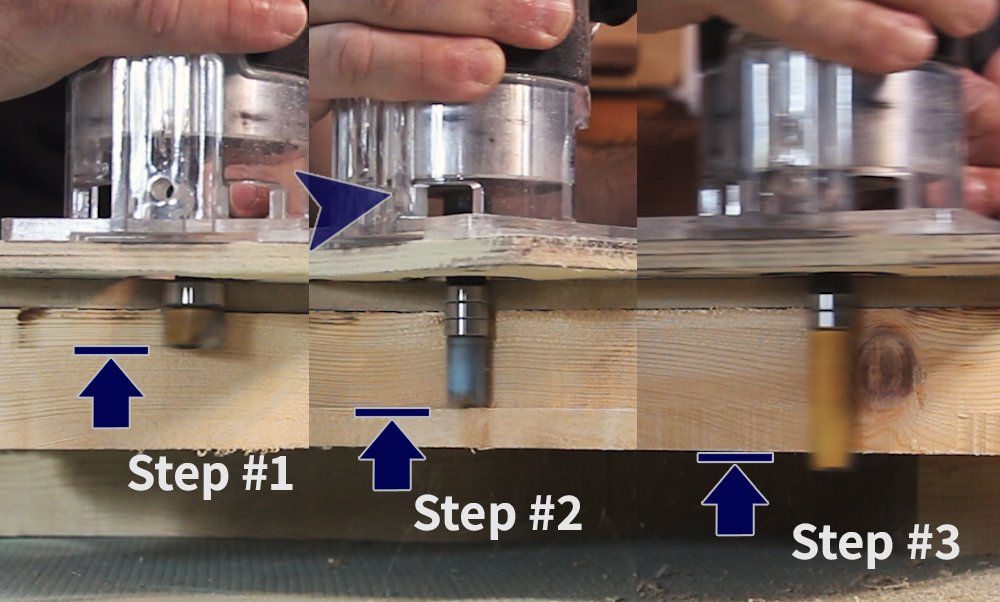
Depending on the size and quality of your router, you have a few methods to choose from. Being carful here may cost you a few more minutes of work but may save your guitar body from mishaps. If you have access to a full-size pin router, you may be able to even skip the drilling and just hog all the material with the router. Some table and larger hand held plunge routers may also be able to handle it. Most medium to small size routers will very much appreciate having only a thin strip of wood to deal with and will also handle better with gradual depth routing. Start with under 10mm of depth (1/4”-1/2”) and then double it. In the third or fourth round you should reach the final depth. It will also depend on the quality of your bit, the speed and of course the wood you are using.
A word on Router Bits
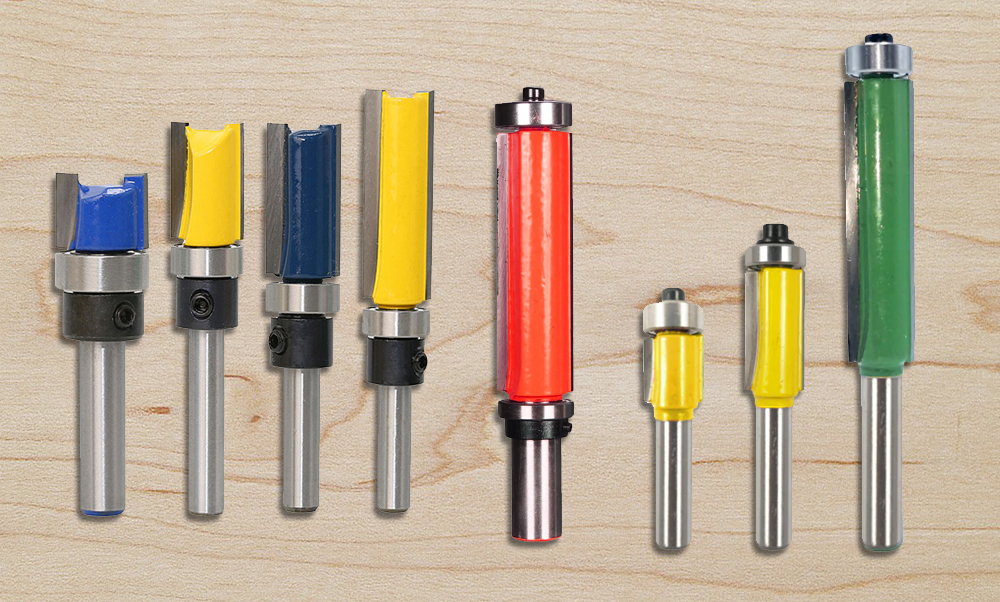
There two types of router bits we will be using for the body: Flush Trim or Template copier and a round-over bit.
The flush trim bit is a carbide bit with a wheel bearing that is used as a guide, along the template. The blade will cut to its depth along the line the template dictates. They come in a variety of lengths and widths. This is the number one bit you will need for most of this build. They can have the bearing situated at the shaft end or the tip for different applications or for a table-mounted router. Larger ones may also have bearings at both ends for more versatility. For cavity work,you will need the type that has the bearing on the shaft side. Having a few sizes will help but if I could have just one I would choose a short one and do more passes with it. A thicker template will also give you a bit more ‘wiggle room’ for the depth.
Much more on Flush trim Bits here
‘How low can you go?’
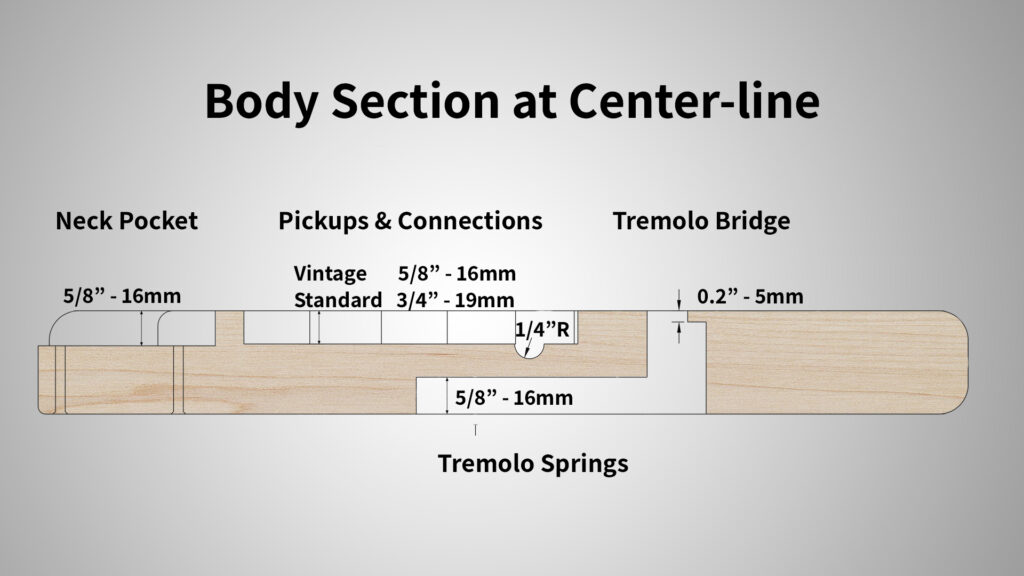
The depth of the pickup cavities in a standard Strat is ¾” or 19mm. Vintage Strats have lower profile pickups and are only 5/8” or 15.9mm. Because of the lower depth vintage Strats also have a small channel under the bridge pickup, for the wiring. In any case,it is always a good idea to check the pickups you have (in advance) and match those. You do not want to go too deep ‘just-in-case’, because you may hit the tremolo pocket in the back.
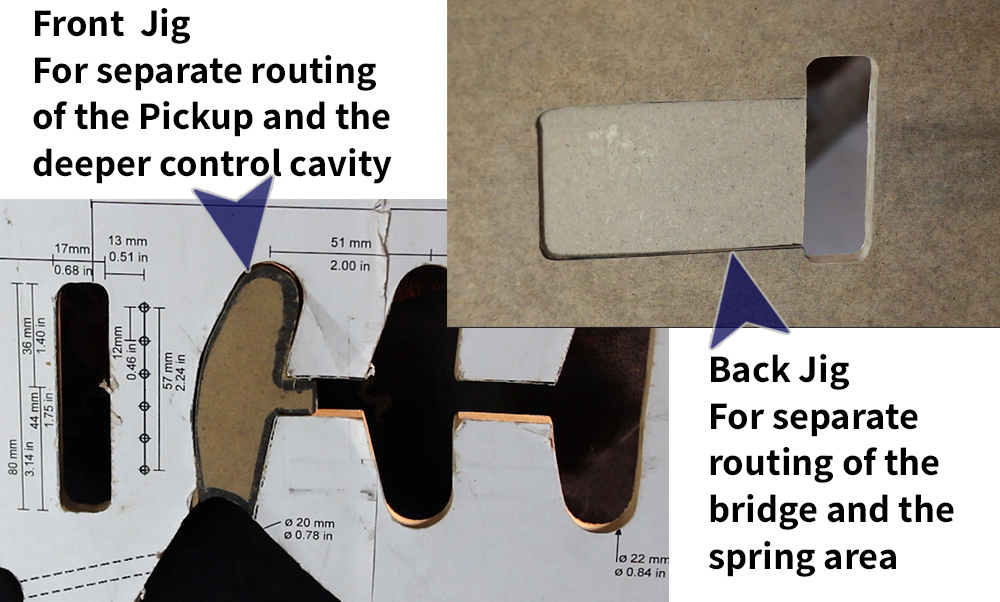
The Control cavity and output jack pocket are a little deeper at 1.5” or 38mm. The Jack is pretty straightforward, but the control cavity has a step down from the pickup cavity and if you want it to be nice, round, nd neat you will want to make a little template jig which will be added after you rout the pickups. This little jig will be in the place and shape of the bridge pickup in the template but will have the lower corner rounded to match the shape of the control cavity. Another little jig should also be fitted in the back to enable routing the deeper cavity for the bridge separated from the shallow spring are.
Routing the Neck Pocket
The Standard Strat pocket is 5/8” or 16mm deep and 2 3/16” or 56mm wide (my plans actually have 57mm). Many Luthiers will only rout the neck pocket after they have the neck, to ensure a snug fit. If you are buying the neck from a reputable source, it should fit. Do notice the typical roundness at the heel of the neck. A Telecaster neck, for example, will not have that and will not be a good fit.
Routing for the Tremolo Bridge
The Tremolo system can be drilled and routed all the way through (or just shy of…) from the front. It will need additional routing from the back, but at this point this will do. This is also a good time to mark and drill the holes for the 6 screws holding the bridge. Again, check with the actual bridge you have to verify the position and make sure it’s not the two-screw version. If you opt for any bridge other than the standard Fender Tremolo make sure to check the specs as it will probably need different routing. If you are going for a ‘hard tail’ fixed bridge, (good choice if this is your first build) you just need the screw holes and maybe holes for through body strings.

Cutting the outline shape
At this point, you should have all the front cavities routed and so we flip the and attach the back template. We will use it to both cut the outline and rout the back-tremolo cavity. Transfer the centerline to the back and carefully align the template to match. (remember to flip it). You can mark the outline for the cut (easier if you are using a jig-saw) or attach the template and cut it together if using a band-saw. The benefits of a band saw are that you will have a cleaner and straight-vertical cut, which will allow you a closer and more accurate cut. The less material left for the router, the smaller the chance of chip-out when routing. Cut around the outline leaving as little extra material as you can.
Routing the body shape
Routing the shape of the body can be very simple and straight forward and definitely seems that way on Youtube. There are a few factors that can make a big difference in the process and include the type of wood you are using, the router, the router bit and the way you route.
A strong table or pin router with high quality (i.e. Expensive) spiral bit can probably route the shape of any guitar in one go. However, with other combinations of tools, you may need to make a more gradual route as far as depth goes and also consider routing direction to avoid chipping. Safer is always better and as a non-professional, the extra time it will take is usually not an issue. I have already mentioned the idea of routing the depth is several steps for the cavities. The same principle can be applied to the outline of the body, only with more increments. Another tactic to make up for ideal tools and experience is being more aware of routing direction.
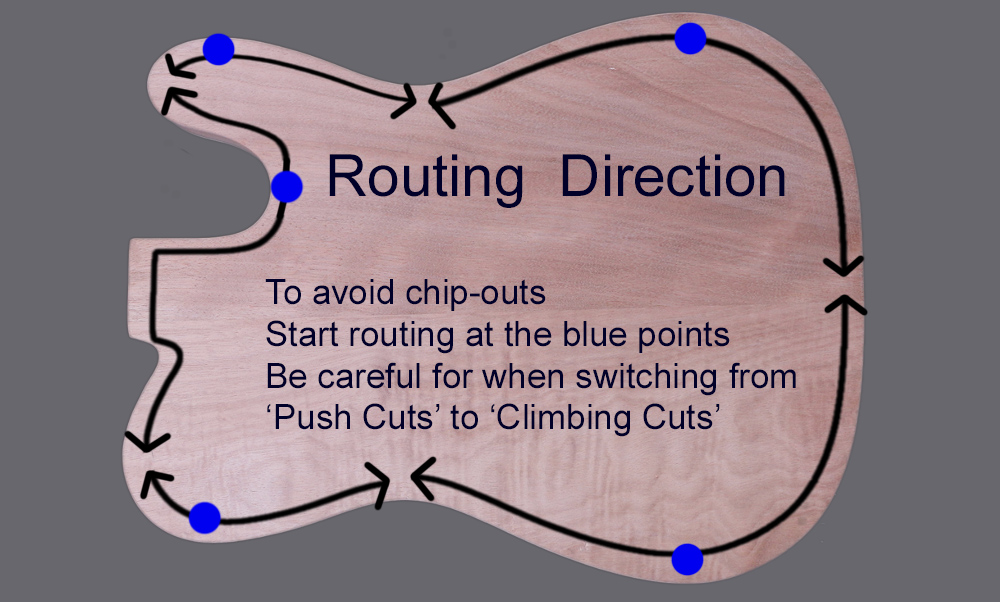
Routing Direction
The rule of thumb in routing direction is to go ‘down the grain’ (aka a” ush Cut). This means you need to consider the blade rotation vs. the direction of the grain. Going ‘up the grain’ (also called a ‘climbing cut’) can chip and break pieces. This is not a problem when routing a straight board, but gets a bit complex with a shape like a strat. To make life a little easier you can actually draw the routing direction on the body itself. You will need both types of Flush trim Bits, bottom bearing and top bearing bit. With a table-mounted router, you can use the one that has both top and bottom and just alternate them by changing the depth of the blade. It will not be enough to change the direction of the motion since the blade still rotates in the same direction, you will also need to flip the body.
Rout the back, tremolo cavity
If you haven’t already, attach the template. It should be aligned with the tremolo hole coming from the front, however, otice that it is wider towards the back than the front. This is to enable the motion for the tremolo block. Again, pre-drill as much material as you can before routing. First rout the whole cavity to a depth of 0.625” or 15.87mm, preferably in two passes. Then you need to rout just the backside of the bridge cavity deep enough so that 0.19” or 4.82mm will be left on the front side. Verify it with the overall thickness of your body. If you have routed all the way from the front before, this can be done fairly easily.
If not, you may need to create another template Jig which will ‘close off’ the spring area and leave the tremolo-block are free to rout. (See image with the front Jig above)
Neck Mounting holes
Mark and drill the holes for the neck mounting screws. I prefer to also align these with the actual plate I am going to be using and make sure the holes align. It is also advisable to clamp a piece of wood in the neck pocket to drill into and avoid breaking the wood in the pocket.
Cutting & Grinding the Arm and Belly Relief
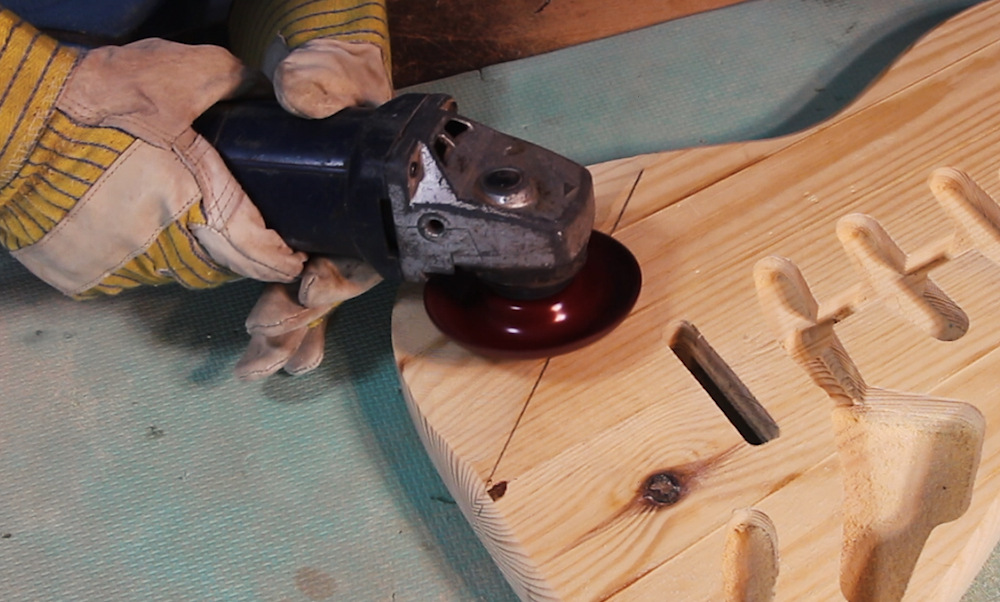
The comfort contours are one of the signature features of the strat. This where some serious carving and grinding will take place. There is a variety of tools which can be used here. The more traditional include a few types of manual rasps and files, the Japanese Saw Rasp being a favorite. You can get very aggressive in the beginning and also use an angle grinder with a Rasp Disk, or if that seems over the top,just use a sander with very low grit, either a belt sander or an Orbital sander. Marking the shapes can be done with a dedicated template or two, using the second set of printed plans (as a template) or just measuring the depth and tips of the contour.
Marking the Elbow contour
To mark it we imagine a 90 degree triangle that has one adjacent of 6.42” or 163mm going down just past the center line and the other adjacent of 5.87” or 149mm going forward towards the top horn. We mark the diagonal of the triangle and the depth which will leave 5/8” or 15.88mm at the thinnest spot. We are trying to create a flat surface starting at the diagonal line and ending at the lowest spot in the ‘corner’.
Marking the belly/ Tummy contour
This one is harder to measure and the easiest way is to just cut the printed plan, align it with the body and draw the outline. The maximum depth here is the same as the elbow and leaves 5/8” or 15.88mm of thickness. There is no particular guideline here other than trying to make it as even and smooth as possible.
Round the corners
This can also be done before carving the contours but it makes the marking a bit more difficult. The one thing you have to do before rounding the corners is make sure that there are no leftover bumps and scratches from the router on the contour of the body. These will be transferred to the rounded edge and will be difficult to remove or sand.
Sanding the sides
Take your time and sand the sides of the body. Don’t worry about the top and back yet, just the sides. You can use any sanding method you prefer as long as you maintain a straight angle. A spindle sander would be very beneficial for al the contours and cutouts but sandpaper on a block or piece of broom-stick will be fine (Some elbow grease required). There is no need for smoothing with sandpaper of more than 150 grit.
Routing the corners
The preferred bit for any Strat is the ½” round-over bit. A table router (or a table mounted router) will be the best choice because of the stability it provides. Any hand held router can do the job just as well as long as you keep it stable and avoid dipping sideways. Run it against the rotation of the bit. If you are not sure, make sure you are pushing the router and not being pulled by it. The same is true for a table router although it will be the opposite side and direction. Much more on Round-Over Bits here
Make sure you stop short of the neck pocket on both the front and the back. In the front you want to taper the rounding manually into the pocket sides. The back of the pocket shouldn’t be rounded as it will leave no space for the screws. Round it manually later and taper it to the rest.
Drilling
We are almost there, there are just a few holes we need to remember to drill, so we don’t have to do it after the finish. Make sure you protect the body from the drill bit and footer.
The first runs between the control cavity and the tremolo cavity in the back and is dedicated to the ground wire. Use a long ¼” or 6mm drill bit and start from under the step where the cavity meets the bridge pickup area, and aim diagonally and down.
The second one is for the output jack wiring and connects to the control cavity. Aim from the upper part of the jack’s cavity, about ¼” from the top, diagonally (as flat as possible without touching the body) and come out about 1” deep in to the control cavity.
The last two are for the strap buttons and should be pre-drilled for the hardware you have. The traditional ones will be about ¾” deep with a 0.1” bit.
Sand and sand.
You should now have a complete body as far having all the major shaping, routing and drilling finished. It now needs to be thoroughly sanded to get it ready for whatever finish you will choose to have. An orbital sander is great for all the flat areas, a spindle sander for the curves and any other methods you have or like. Start with 100 grit for the rougher areas like the contours and work your way through 220, 320 and 400. 400 or 600 is smooth enough to start most finishes. Be careful on the edges and the thinner parts such as the neck pocket area. You may want to sand those manually and with higher grits. Sanding is an integral part of guitar building, embrace it.
A word on routers and safety
Routers have very fast-spinning, exposed blades, and can do a lot of damage fast to both the guitar and you. They are also very noisy and send chips flying in all directions. If you are not familiar with routers I strongly urge you to always use eye, ear, and breathing protection and get familiar with it in a safe environment with scrap pieces of would. (If you are familiar, then you know you need protection gear)
Variations
Since the rise of the ‘Super-starts’, modifications have become very popular and the varieties are endless. Fender’s custom shop is probably the biggest testament to that. This template and these methods are a good base to most of them. You can easily change the configuration of the pickups, the bridge or any other part, and change your templates to reflect it. Want a hard tail with a humbucker in the neck position. Duplicate the template and change the cavities to reflect it.
Tips
Measure, measure, cut! Check and double-check before you cut, we all make mistakes, being less experienced does not exclude you.
Test. Whenever trying a new tool or a new method, try it on a piece of scrap wood. The guitar may not be as forgiving.
Have your ducks in a row. Chances are you will be ordering most of the parts online and there are always surprises and inconsistencies. Check your parts and hardware and make sure they match and fit together before you cut and drill. Sizes may vary, even with original parts, positions may change and holes may be different. This is even more true if you are using different variations of a pickguard, pickups,or a bridge.
Conclusion
The recognizable shape of the classic Stratocaster poses a few challenges to the novice builder. I have tried to point every obstacle you can encounter and give options for different tools and methods. I hope this guide will make your journey into guitar building, that much more fun and easier.
To make things even more clear I have also made this four part video: