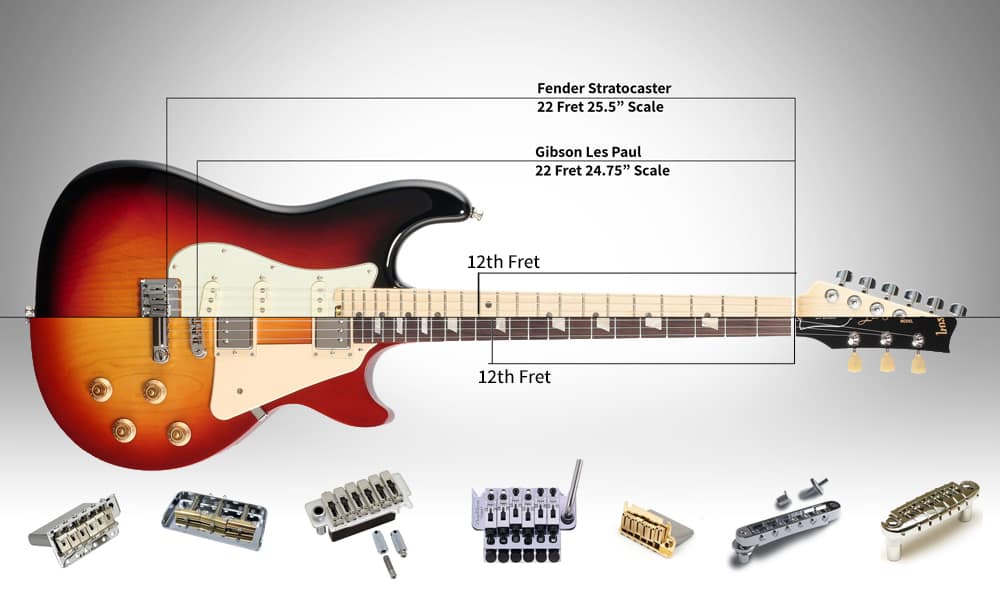


In the world of electric guitar necks there are a few variations of construction. For the sake of simplicity, I will take the example of typical Gibson with a fat heel, glued in, binded, angled head neck, vs the typical Fender, with a bolted on, flat heel and flat headstock. The difference in wood choice is not as important for the construction. We love them both, and in this build we will concentrate on the Fender Style Neck.
How do you build a Stratocaster Style Neck?
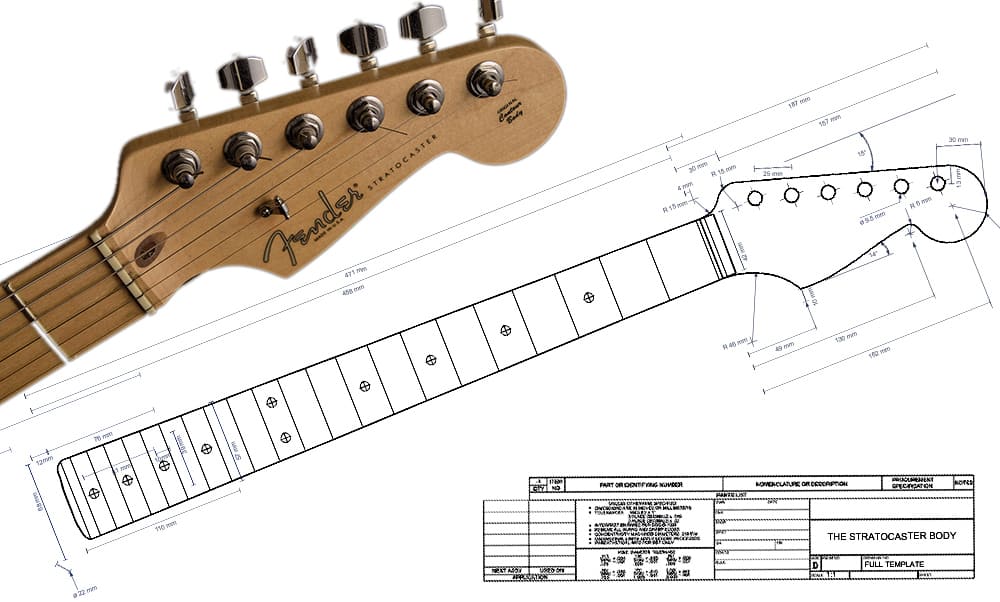
- Decide on specs and create a Template
- Decide on types of wood/s and cutting to rough size
- Routing and installing the Truss Rod
- Cutting and routing the basic shape of the neck and headstock
- Shaping the neck back, drilling the headstock and thinning it
- Cut the slot the fretboard, drill for the inlay and glue in the dots
- Radius the fretboard, glue it to the neck, cut and shape it to the neck width
- Install the frets and dress them
- Lacquer, oil, buffing and installing the machine heads.
There are a few variations and different methods and order in which the process is executed and it depends on the type of tools used and personal preferences. Considering great many Luthiers could swear by their methods and may disagree, I like to experiment in tools and methods and maybe someday I will be sure enough of myself to say what is ‘right’. I will however give my consideration for every step we go through. So let’s dive in.
Preparation
‘chance favors the prepared mind’
When cutting and gluing wood there is often no ‘Undo’ or second chances and as creative and artistic as we’d like to be counting on ‘happy coincidences’ is not something I like to incorporate into neck building. It is good practice to plan ahead and have everything laid out, figuratively and literally.
Plans and Choices
Since we are essentially replicating an existing design, there is no need to be over creative with the plan. You can find plans for different models of Strats in various websites, I’ll be using a set of plans from electricherald.com. Stratocasters have had their share of variations through the year, but the basic shapes have been the same.
You can make your own version or stick to specs you can also find on the Fender website if you want a more exact replica.
In this build I’ll be aiming for specs of a 70’s style strat, with a 9.5” C shaped neck, 22 Frets and 25.5” scale length.
Tools, Materials and Supplies
There are some tools that are essential to the building process, and others that can have substitutes with different methods. I will be using tools that are readily available to most hobbyist woodworkers and Luthiers, mostly hand tools or conversions of such with the aid of some Jigs I have built myself. No fancy CNC machines here.
I am going to point the tools along the way, if you want a full list be sure to check out my post - ‘the-ultimate-guide-to-guitar-building-tools’ (https://theelectricluthier.com/the-ultimate-guide-to-guitar-building-tools/)
Strats typically have either a one piece maple neck or a maple neck with Rosewood fretboard.
Do make sure you have the tools and supplies you need in advance.
Hardware: A Truss Rod, Frets and Machine Heads will be necessary. The specs are flexible but it’s good to have everything in advance so you don’t end up routing or drilling the wrong size.
Time and place
Building a neck might not be something you would do in one day, so it’s a good idea to have an allocated area where you can just leave it and pick up from the same point next time without having to organize the working area in the beginning and end of each session. Take into account a lot of saw-dust, wood shaving and chips, glues, oils and possibly spray.
Making the Template
The benefits of working with a template are numerous and great to the novice Luthier as much as the Pros. Took me more tries then I care to admit to get the first one right. Lucky that was not the guitar itself. On top of that, a good template can serve you multiple times and give you great accuracy and consistency. The preferred material is 10mm MDF. It is easy to work with and gives very smooth and predictable. It’s also not expensive so it’s great for all those accidents and beginner mistakes.
Print out the Plans
Print the neck shape in 1:1 scale. If you don’t have access to a plotter, which will print it on one sheet of paper, you can tile it (if it’s a pdf file) on A3, A4 or letter size paper through the ‘Poster’ option in the printer. The thicker the paper, the easier it will be later. Make sure you tick the ‘cut marks’ box to get crosshairs on the corners, to help align the tiles. The smaller the paper, the more tiles you will have and the bigger the potential for errors in accuracy. We are not counting on this for accuracy, but it’s nice to have.
A word on accuracy –‘Measure, Measure, Cut’
How accurate the guitar and turn out is entirely up to you and depends on your experience and attention, but also on the types of tools and methodology you use. In most areas of the build, there is tolerance and if the body is a 0.25” smaller or larger, you might not even notice. However, the neck in general and the fretboard area in particular, will suffer from inaccuracy. Misplaced frets will not let you tune and intonate the guitar properly, missing the shape or thickness of the neck will change the feel and playability of the instrument and a badly shaped nut will either cause buzzing or have
an uncomfortably high action.
Pasting the printed plans
Cut the printed plans (the top view of the neck only) and paste it on a piece of MDF. Spray glue is preferable to white or carpenters’ glue as the latter wrinkles and may distort the paper. This is a good time to check the actual size against the specs. Check the thickness of the printed lines to see where the actual cut should relatively be.
Notice that the Fretboard is loner and rounder on the heel side, and will need a separate template.
Cutting the template
Cut along the outline of the neck, using a band saw, a Jig saw, a table or any combination of those. Make an effort to make the lines along the neck as smooth and accurate as possible to save on sanding. You can also use a straight edge of sorts and route them using a Flush Trim Bit (Template copier). Remember, the whole idea of a template is that it copies the exact shape to the neck itself, kinks and bumps included, so make sur the template is smooth and straight where it should be. Mark and copy the centerline of the neck and the nut position. Don’t forget to drill the holes in the headstock for the Machine heads. You may want to only drill the pilot holes in the center, it will be easier to transfer accurately to the headstock.
Working on a squared neck
To get started you need a slab of wood of at least 1.5”x4”x26” (about 30mm X 100mm X 660mm). At least one side has to be straight and flat. If you can run it on a jointer to have angles square life will easier and more precise. Working with straight angles is easier for measuring, routing and planing. I like to do as much as I can before shaping the neck.
Routing and installing the Truss Rod
Mark the center line on the top of the neck. Measure and mark the thickness and note the thickness of the truss rod for the desired depth. Find the matching straight carbide tipped bit. You can use a guide or a jig to route the channel for the truss rod. There are different types of very simple jigs, depending on the type and size of router you have. Mark the ends. The truss rod nut should be right under the neck nut.
Don’t try to route the full depth at once, it is better to start very shallow, measure again and get to the final depth after a few goes. Depending on the Truss Rod you have, you may need a to have different depths in the two ends. You want the Truss Rod to fit snugly in the groove and be pretty much flush with the height.
What if the groove ends up too wide or deep?
If there is any extra room, you would want to prevent the rod from rattling. There are a few methods for this which include, sticking masking tape or drinking straws in the spaces, or even some wax or a few dabs of silicone. The silicone maintains its flexibility when dry, so it wouldn’t jam the rod later.
Cutting and routing the basic shape of the neck and headstock
This is where the template really comes into play. Place the template on the Neck and make sure it’s center line is aligned with the neck. Use double sided tape to keep it in place. Cut along the outline using a band saw or a Jig saw and leave as little as you can to make the router’s work easy as possible. The less force you need to use with the router, the better.
Using the Flush Trim Bit, with the Bearing against the template go around the neck to get a perfect template copy. Mark the positions of the holes for the machine heads and remove the template. At this point you should have a neck that looks right from the top but is a long cube from the side view.
Cutting the profile of the neck and headstock
Before rounding the neck, we want to cut it to the correct thickness and thin the headstock thickness. You can use a Band Saw, a Router with the right jigs and Bits, a Grinder, a Planer, a Rasp Saw or a combination of all of the above. If you have a Press Drill, you may want to drill the headstock holes at this point. If using a hand drill, you will probably get more accurate spacing after the headstock is thinner.
Shaping the neck back
Getting the neck to its desired ‘C’ shape may be tricky, but there a few ways to insure you don’t over do it.
- Create “radius guides” for two or more positions along the neck and check constantly.
- Draw lines across the length of the neck and chamfer between the to get multiple angles you just need to smooth later.
- Start with a 1” Rounding over bit (or another profile you find fitting) to get you a nice ‘D’ shape to start from.
Remember to leave the heel flat and the create the triangular volute at the back of the neck where the neck meets the headstock. The Volute gives a bit of extra thickness at the thinnest point in the neck.
If you haven’t drilled the holes for the machine heads before, now would be a good time. You may want to check back with the plans and the template.
Slotting the fretboard
Oh, the dreaded fret slots. Probably every beginner guitar builder’s nightmare. I could probably fill pages of material on techniques and theory of fret slotting. Classic Luthiers do the measuring and cutting manually. I find that this method requires a very steady, and experienced hand with the saw, and leaves way to much room for error. Therefore, a jig will be required.
Which fretting jig should I choose?
As I do with most techniques, I like putting to the test the simplest and the cheapest first. I have no doubt that the awesome ‘StewMac Fret Slotting Miter Box’, costing upwards of $215 will do a bang of a job. There are other sophisticated, durable and professional fretting jigs out there, and if you are planning on mass producing guitars, you should definitely make or get one. Part of my fun is exploring and finding practical solutions that just work. I am just going to show the simplest, and cheapest, jig I found for getting accurate and straight fret slots.
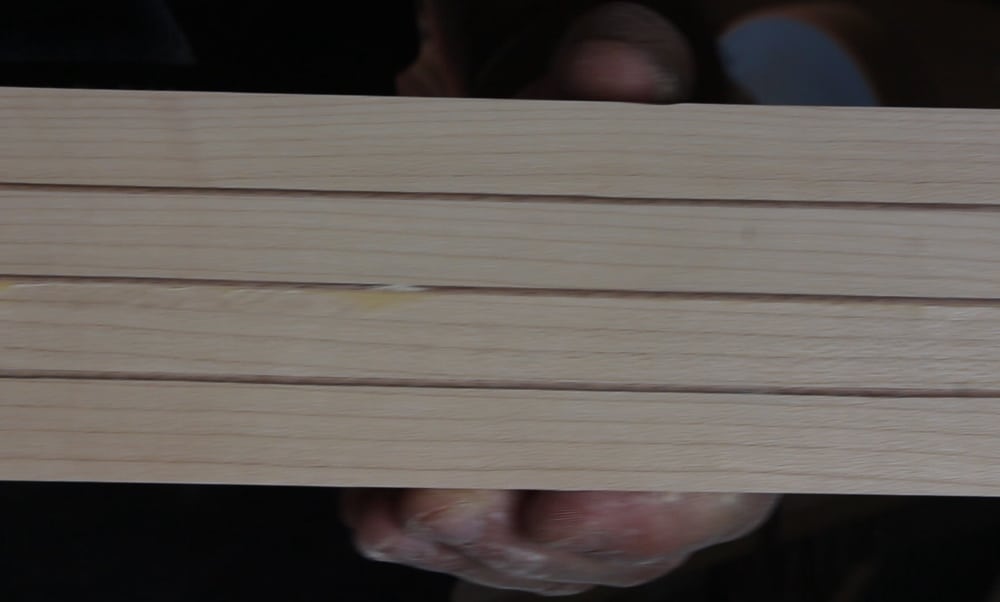
My fretboard is still square, so cutting at a straight angle fine
The jig is comprised of:
- A miter box made of MDF with very thin slot to fit the saw.
- A factory-made slotted fretboard- as a template
This jig eliminates the need for measuring distances with ridicules increments. Now all you need is a decent saw with the correct blade thickness 0.022” (0.56mm)
Steps for cutting the slots:
- Double tape the Fretboard, back to back, to the Template fretboard making sure that the nut side and the centerline align perfectly.
- Fit the fretboards in the miter box and align it to one side, with the template facing down.
- Slide the fretboards until the jig blade snaps into the first frame slot.
- Insert the saw into its slot and cut to the marked depth.
- Slide the fretboards to the next slot and repeat.
After twenty-two of these, you are done.
Drill for the inlay
Measure the diameter and thickness of the dots and find a matching drill bit. Usually its 6-6.3mm and 2-2.5mm depth. The drill bit will always leave extra room for the glue, underneath, so it should be a tight fit.
Mark the position of the point using diagonal lines between the frets to find the centers.
Do the same for the side dots. Take into account we still need to radius the fretboard so those sides are going to be thinner. You may just want to leave the side marks for after the radius sanding.
Glue in the dots
After drilling, put a few drops of superglue and put in the dots. They should be flush or ever so slightly higher than the fretboard surface. We are going to smooth them when sanding the radius. But the center point of the board is not really going to be sanded a lot.
A word about Superglue
Superglue has quickly become one of the ‘go to’ adhesive for many tasks. The benefits are that it is strong, it dries fast, it’s transparent and if mixed with saw dust it can dry to rock-hard material, great for repairing chips, cracks and little holes. The downsides are that it is hard to clean and will stick your fingers to anything, or each other.
Radius the fretboard
This is another place where a simple jig will make our work easier and give us consistent results faster. All you need is a channel in the width of the sanding block to run the sanding block.
Start with 80-100 grit Sandpaper double sided glued to the radius sanding block. Use the rough grit to get the correct radius and check with a radius gauge.
Once the radius is correct start working up to finer grits, eliminating the scratches from the former grit at each step. Jumping from 80 to 400 grit will not eliminate the rough ones so it’s better to go through 120, 220, 320. Beyond 400 you can get rid of the block and go manually. There are different views on how smooth or shiny you want the board to be and if it even makes a different beyond 600 grit. Ebony and Rosewood are pretty hard and eventually can get shiny when sanding beyond a 2000 grit. Sand away to the point it feels smooth enough for you.
Align the Fretboard to the neck
The two points of reference you need to look for are the center-line and the nut position. Check how straight and flat the two fit. There should be no space between then with light hand pressure.
How to keep the two surfaces aligned while gluing?
When gluing two flat surfaces and applying pressure, they will often slip and slide sideways. In this case you can’t add another clamp vertical to the top clamps as the surfaces’ edges are not aligned. A simple trick is to drill a small hole through the fretboard into the neck and insert a small pin, wooden, plastic or metal. This will be done inside one of the fret slots and should be small enough in diameter, that the fret itself will cover it. This needs to be done in two places to avoid hinging, and should be drilled away from the truss rod.
Glue the Fretboard
Apply a thin layer of carpenter’s glue to both the fretboard and the neck attach them. Clamp them using as many clamps as needed to achieve uniform pressure. Using radius block or similar shaped blocks will help in spreading the pressure on a rounded surface. Clean the excess glue with a wet rag, as much as possible, and let it dry. ‘Titebond’ is said to fully cure in 24 hours, although many would unclamp it as soon as 30 minutes. I usually let it sit overnight, just to be on the safe side. (Or maybe I should just read the directions on the box..)
Cut and rout the Fretboard
After removing the clamps, scrape any dried glue you missed when clamping. Remove the extra width of the fretboard with a band saw or jig saw, leaving a couple of millimeters for the router, and then rout it with the Flush Trim Bit using the neck itself as the guide for the bearing.
If you skipped on the side markers before, this would be a perfect time.
Sand the fretboard flush with the neck.
Preparing for Fretting
The frets need to be bent to the correct radius and cut to length. It is a good habit to have them laid out in order in a dedicated stand or evn on a piece of masking tape. If you are not planning on mass production, you can find pre-bent and cut frets for close to same price as buying by the foot, and it’ll save you the ‘FretBender’. Some Luthiers like to overbend the frets so the tips will not lift when being hammered in.
Manual Hammering or Fretpress?
Here too, there are a few methods. I will be using my improvised fret press, made of a drill press and a Fret Press Caul, which you can buy separately fron the press itself. The frets will be lightly hammered, deep enough so they don’t fall out, and then pressed into place. The more accurate the fretting is, the less work you will have dressing them.
Frets and glue
When fretting, there is not real needed for the fret to ‘hold on’, the fret tangs’ barbs will do that. The main function of the glue here is to fill in all the tiny gaps between the metal and the wood and create that extra layer of strength. The other important reason for filling in all those gaps is acoustic. I am going to be applying the glue post fretting, it leaves me a bit more room for error during the fretting itself.
Fretting
After pressing all twenty-two frets I check them with a straight edge and the fret rocker just to see if there is one fret that may need an extra press to nudge into the correct height. Than I apply the glue.
Taking care of the fret ends
After nipping the tips of the frets file them at 55 degrees from the fretboard using a Fret Beveling File. A Fret Leveling Beam can also do the job, you just need to keep it at the approximate right angle, which may be tricky. With a leveling beam you can also play with the angle ang give that bevel a bit of rounding after the Beveling File. Make sure you don’t go too deep with the rounding to avoid the E strings from slipping off the fret.
Decals
This would be the point in time to add a logo or decal to the headstock. You can use a sticker or waterslide decals and then paint the clear coats.
Finishing the neck
Regardless of the tools and technic you will use for finishing (and that’s a post by itself) you will want to have the neck and headstock to be sanded to 600-800 grit and cleaned from the dust.
Fender uses Urethane Matt finish on its necks, with a slightly higher sheen on the headstock. If you don’t have access to a compressor and a spray gun, you can still get great results with spray cans of either Urethane or Polyurethane. There is a variety of reputable companies and all levels of sheen, from flat matt, silky to glossy.
How do I achieve a smooth finish with spray cans?
To avoid paint running it is advisable to spray two to three thin coats with 10-15 minutes between them and then give it hours to fully dry before sanding. You may want to layer those a few times with sanding between every two or three layers to get a very smooth finish. Much like sanding wood, the idea is that every time you raise the grit to smooth the tiny scratches the former, rougher grit left. You want to build up enough of a layer to get rid of the ‘Orange peel’ texture that the dry spray leaves. Sand it up to 2000-3000 or even 5000, which will give it a bit of a shine by itself. For a fine mirror gloss buffing with polish compound.
Pro Tip – If your spray can is ‘spitting’ despite having a clean nozzle, put the can in warm water (not boiling! – it’s a pressured can) to make it ‘runnier’.
If you want a handmade finish you can use Wipe-on Polyurethane applied with a combination of, high grit sandpaper, rags and 0000 steel wool, you can reach very smooth and glossy finish as well. Buffering with a polish compound will even give a mirror like gloss.
To achieve a flat matt look, regardless of the finishing method, you can lightly scruff it with 0000 steel wool. It will not scratch it, just dim the gloss.
Dressing and Polishing Frets
For a detailed description of the dressing and polishing of frets please see my “Buy a cheap guitar neck and make it Amazing “article. /
Install the Machine heads
Align them in place and mark the place for the little screws in the back. Drill the pilot holes for the screws and attach the machine heads. Fasten the nut and bushing in the front.
That’s pretty much it. We still need to slot the nut and set up the relief and action, but all that will have to wait till the neck has a body attached to it