

Should a child have a normal guitar and grow into it? Is your custom shop Les Paul too heavy (or expensive) for your child to start shredding on? Does your little princess want to ‘let it go’ only on a pink guitar with glitter?
To get a child into the world of guitar playing will require a guitar of the right size, comfortable enough to play and cool enough Building an electric guitar for kids will not be a child’s play with lack of kits of the shorter versions, and unless you get a neck custom made (not going to be cheap), you are going to pretty much do it all from scratch.
On the bright side, you have the freedom to really let creativity run wild and have a truly unique instrument. Either way, better get started, they grow up so fast…
Size Matters- What size is right for your kid?
A good rule of thumb is that the average sized 12-year-old can handle a full-size guitar. Under that a ‘mini’ variation would make things much easier. If you want your 5-year-old to get a head start, either start stretching those little digits or consider a Ukulele.
After Writing this I did manage to find one company that does carry a few guitar kits that are defined as ‘children’s’. Tomtop is a large importer from china and seem to know what they’re doing and the ability to back it up. The brand name they carry is Ammoon, which I have run across a few times, and they carry 2 Les Paul Style Kits, one with a single humbucker and the other with two. There is also a ‘Strat-ish’ version with one Humbucker. The only
thing is there are no detailed specs to those guitars and it’s hard to tell from the images although the Strat-ish one does look significantly smaller. Want to gamble? The worst thing to happen is you are stuck with an unconventional sized Les Paul or an odd little Strat. I am sure you can make them playable, learn a few things on the way and even enjoy yourself, and isn’t that what it’s all about?
When I get around to getting one myself, I’ll be sure to post my review..
There are three factors to consider when it comes to size:
- The sheer size of the instrument itself. The average 9-year-old just looks like he or she is obscured behind a Cello with a full-sized guitar
- The weight. Strapping on any full-sized electric guitar, not to mention a full Mahogany bodied one, may just be painfully heavy for the little musician.
- The guitar scale: The scale is the length between the bridge and the nut. It determines the spacing the frets and, in our case, how much will the tiny fingers have to stretch between the frets.

How do we overcome these issues in an electric guitar?
The size can be thought of in two parts: The scale (not to confuse with proportions) and the size of the body.
The scale:
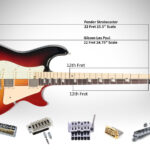
Scale length is defined as the distance between the edge of the nut, the side that meets the fretboard, and the bridge. It is calculated as twice the length between the nut and the 12th fret (which is a full Octave). For Example: On a traditional Fender neck the distance between the nut and the 12th fret would be 12 ¾”. Double that and you get a 25 ½” scale.
Only in the last few years have guitar maker such as Fender and Ibanez added a ‘mini’ version to their repertoire. The Squire Mini Strat is a ¾ version which boasts a 22.75” scale (compared with the 25.5” of the full size) and the Ibanez Mikro stretches it’s scale to just 22.2”.
We’ll get to the exact measurements in a bit, but we know the ball park of scale length we need.
The Body:
There are really no limitations (other then practical) to how small the body can get. You can take any of the classic shapes of guitars and just scale them down till it looks comfortable. Do take into account the space need for all the hardware. You can also take the more creative route and just create any shape you see fit
What about the weight?
Considering we’re gong to be shrinking the body there are two more ways to reduce weight:
- (Not going to get into the whole ‘ToneWood’ discussion, that’s a separate post altogether)
- Create holes or cavities like many semi hollow guitars. More on how later.
A few more things to consider before the magic starts:
K.I.S.S for kids – Keep It Simple Stupid (Just a suggestion) means ‘don’t over complicate the design if not necessary’. Your child will probably not appreciate a Floyd Rose Bridge, Intricate Pickup configurations, built in equalizer etc. Of course, this is YOUR project so if you want to challenge yourself, all the power to you.
Make it Robust. Kids will be kids and chances of this guitar falling, hitting things and getting hit look very ‘promising’. I would try and avoid thin parts and sensitive areas. For example, a Scarf Joint, which gives most Gibson guitars’ headstock that nice angle, is notorious for breaking if the guitar falls backwards.
(I’ve seen it. Makes you want to cry)
With the shorter scale and the smaller body, the pickups and the frets are going to be a tight fit. Fender with the three single pickup arrangement, solved it by sacrificing a couple of frets to leave just 20. Ibanez on the other hand did not compromise on the frets (on the contrary they put 24 frets) and managed to squeeze ‘only’ two humbuckers.
Planning the Scale and Fretboard
A few words about Intonation
Intonation is the idea that every string is not just tuned in open string, relative to other strings, but also in-tune with itself. It’s actually very simple. Assuming the frets are positioned correctly, playing an open string should be exactly 1 Octave lower than playing the same string on a fretted 12th fret and should sound harmonic. It is checked on a string by string base and the way to adjust this is to either slightly shorten the string or lengthen it.
How can you shorten or lengthen the string?
Fortunately, guitar makers realized the intonation fluctuates with temperature, humidity and time, and have all included a simple mechanism for adjustment. All types of bridges have ‘Intonation screws’ for that purpose exactly. Depending on the model and side the screws are located, rotation to one side will lengthen the strings scale and the other will shorten it.
Do all strings have the same intonation?
That would be too simple. We also have to leave a little room for string thickness compensation. In simple words, the thicker the string, the longer the scale needs to be. That is why the Tune-o-matic bridge (Common on Les Pauls) is placed on an angle. The High E side will be exactly according to the scale length, but the thicker, Lower E side will gain an extra 1/16”- 1/8”. On top of that you also have the little ‘Intonation screws’ to fine tune. In most other types of bridges, you will have a Saddle system which can also be adjusted to shorten an lengthen the scale/ string. Much like the Tune-o-matic bridge you will want the High E saddle to be closer to the pickups side (Not all the way, you want a little wiggle room for fine tuning) and Lower E saddle pulled back a little, so saddles themselves should have enough range of motion to provide that compensation.
I go more in-depth into tuning and intonation in “Setup your guitar like pro in 12 Simple steps”
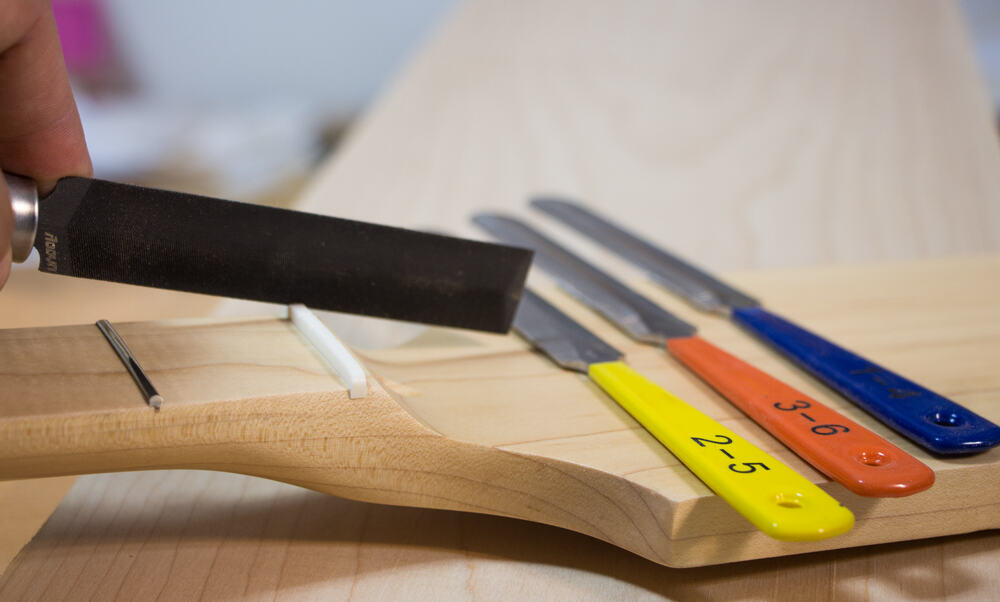
Marking the correct placement for the frets
Personally, I would go with the 22.2” option, the difference is not that huge anyway, might as well make the most (actually least) of it.
If you are not sure if you want the 22.2” or the 22.75” scale, here are the measurements for fret distance for both:
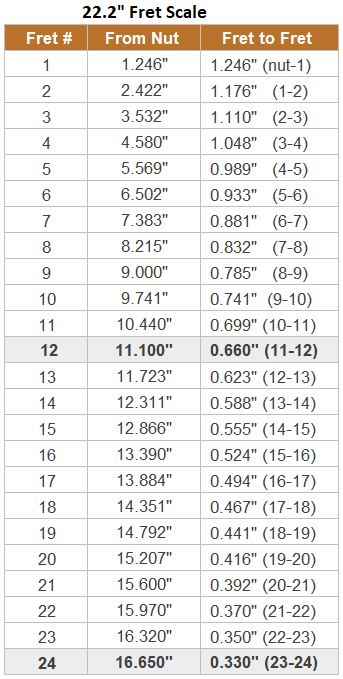
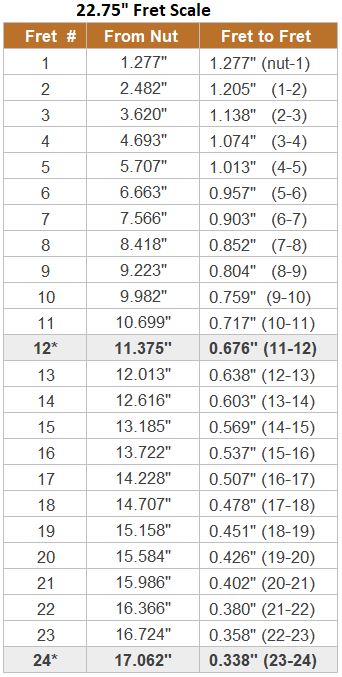
One fretboard, Two measuring methods
Notice that the table has two sets of measurements. They are the same scale with a different method of measuring.
The distance is always to center of the fret/ fret slot, so it makes no difference if you are planning a Jumbo or any other type of fret.
‘From Nut’ means you always keep the exact same point of reference. At this point in the build there is usually no nut yet so the point of reference is the tip of your fretboard. The consensus among professional Luthiers is that more accurate measurements will be achieved by using the ‘from the Nut’ measurement and using the ‘Fret to Fret’ distances to double check. The benefit is that if there are any mistakes, they will not be cumulative. If you are doing ‘Fret to Fret’ and missed the second one by 1/16”, all the frets from here on will be off.
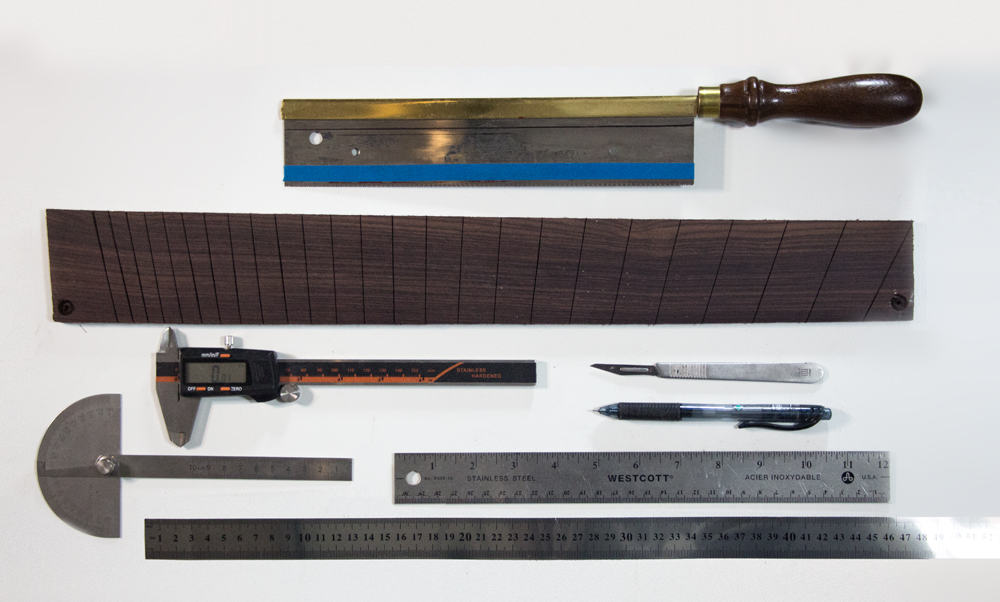
Measure, Measure, Cut!
The old proverb cannot be more appropriate than when cutting slots for frets. It’s no coincident two measuring methods are applied. If you want to a stickler for accuracy (this is a good time for it), I would double check each method and end up with ‘Measure, Measure, Measure, Measure, Cut’. Seriously, you do not want to end up with badly placed frets.
From here on there is no difference between the full-size guitar neck. Check out “ 12 Steps to a beautiful (guitar) neck”
Back to the body
As mentioned above, since the body is probably going to be relatively smaller than standard whether you are going for a ‘replica’ of sorts or a more original design, the only other concern may be weight. If you choose a very dry or light type of wood, there may not be a problem at all.
3 ways to cheat heavy wood
So, you have a nice slab of Mahogany you can hardly lift yourself. (OK, I’m exaggerating) It’s got great tone and it’s beautiful but a bit on the heavy side. What to do?
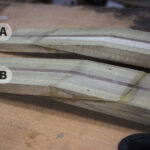
- Carve it thin. The only places the body needs thickness are the pickup area, the nobs and switches and the neck slot. The rest can be planed, shaved and sanded. Even if it’s a Gibson styled ‘carved top’ or a ‘Strat’ style, just take off an extra half inch where possible.
- You are going to be routing slots for the hardware. Traditionally the pickguard covers a lot more than just the slots you NEED. Stay within the Pickguard limits and drill or rout a few more holes. To maintain the integrity if the wood and the support pickguard it is better to make a few smaller holes rather than one large cavity. The same can be done from the back if a pickguard is not part of the design. Have larger back covers and you are gold.
- For guitars with a glued-on top with binding there are large areas that can be drilled out before gluing the top.
Do take into consideration the overall balance of the guitar. You don’t want the body to be to light and have your child struggle with the neck ‘diving’.
We’ve covered all the issues that make the ‘Mini’ guitar different from its standard counterpart. To get the rest of the details, tips and techniques do check out my other posts.