
For many years Luthiers relied on years of experience and precise hand motion for accuracy and consistency in the construction of stringed instruments. Tools were manually maintained and sharpened and every angle and groove were meticulously created. Today, power tools and CNC machines have taken over a large majority of the woodworking part of building a guitar. While most hobbyists can’t justify owning a CNC machine a handheld or even a small table router is well within the reach of most woodworkers, and will greatly help when building an electric guitar
What are the most useful router bits when building a guitar?
The most useful Router Bits for any guitar style are:
- Flush trim bit, AKA Template Copier.
Depending on the style of guitar you will also want:
- Chamfer or Round-over Bits,
- Straight Carbide Tip
- Rabbet Bit with multiple bearings
Luthiers have been successfully managing similar tasks using plans, chisels, rasps and sand paper for many years, and still do. However, the Router is maybe the number one power tool an aspiring electric guitar builder would buy and with the help of the right Bits will enable greater acuarcy, speed and ease for a multitude of tasks. A router with the right bits can be a very versatile tool. Let’s see what these bits do and how to make the best out of them.
What are routers all about?
The router is one of, if not the most versatile power tools in a workshop. With the right bits and accessories, it is real asset. A router is a tool that has a flat base plate with a fast turning blade in the middle. The blade can be used to either cut out (rout) material according to the depth of the blade, or, when used with a guide or bearings, shape an edge to shape of the blade’s profile. There are a few variations to the router, including a ‘Plunge Base Router’, a smaller ‘Trimmer” and a ‘Mounted Router’. The bits are mounted on a collet which can fit bits with a ½”, 3/8”, or ¼” shaft. The base plate can also be adjusted one way or another, so the depth can be controlled.
Types of Router Bits
Flush Trim bit (Template Copier)
They make the edge of one material even with the edge of another. They usually have a pilot bearing that is flush with the blades and can be mounted on the base of the blade, at the tip or both. It is an easy way to make copies. You can use it to laminate or route multiple identical pieces with a pattern or a template and It can be used to duplicate a pattern by fixing a template on a piece of wood. The bearing follows the pattern. If the guide bearings bear against the edge of the template, it will duplicate the shape onto the bottom piece. This bit can be used on a table mounted router or a hand-held router, with the former giving better stability.
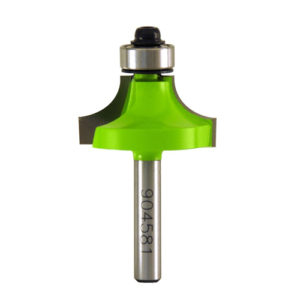
Chamfer or Round-over Bits
They are used to shaping the edges. These bits will usually come with a bearing at the tip, and straight (for Chamfer) or round profiled blade. The size and radius of the blade will determine the shape of the final edge. They can be used with hand held routers, trimmers and mounted routers
Straight Carbide-Tipped
Much like the Flush trim bit, but without the bearing to guide it. Good for ‘eating up’ and freehand hollowing of cavities. They come in a variety of sizes and can be used for very delicate work with a small diameter tip and a handheld trimmer
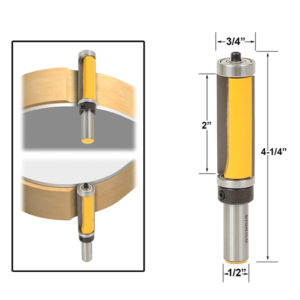
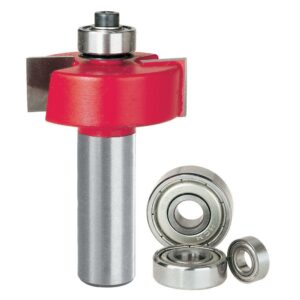
Rabbeting Bits (Binding Router Bits)
Built much like the flush trim bit, but with the blade protruding past the bearing. These will often have multiple diameters bearings, to be exchanged as means to control the size of the ‘step’ that will be crated.
Where would we use them?
The Flush Trim Bit
If you are using templates, and you should, this bit will help you create the outlines for the body, the outline and maybe profile of the neck and headstock and the various cavities for the pick-ups, the pots, the bridge and switcher. If possible, use it on a table mounted router. When routing edges the router has a tendency to pull down and may put a dent in the wood. Flipping it and working on a table will eliminate that. For the cavities, use the hand held option, you need to see the it… Make sure the bearing aligns with the template. If the bit is a bit short and will not take the full thickness of the body at once, no problem. Just take the bit out a bit more and use the freshly routed wood as the template for the second round of routing. It will actually make it easier on your router.
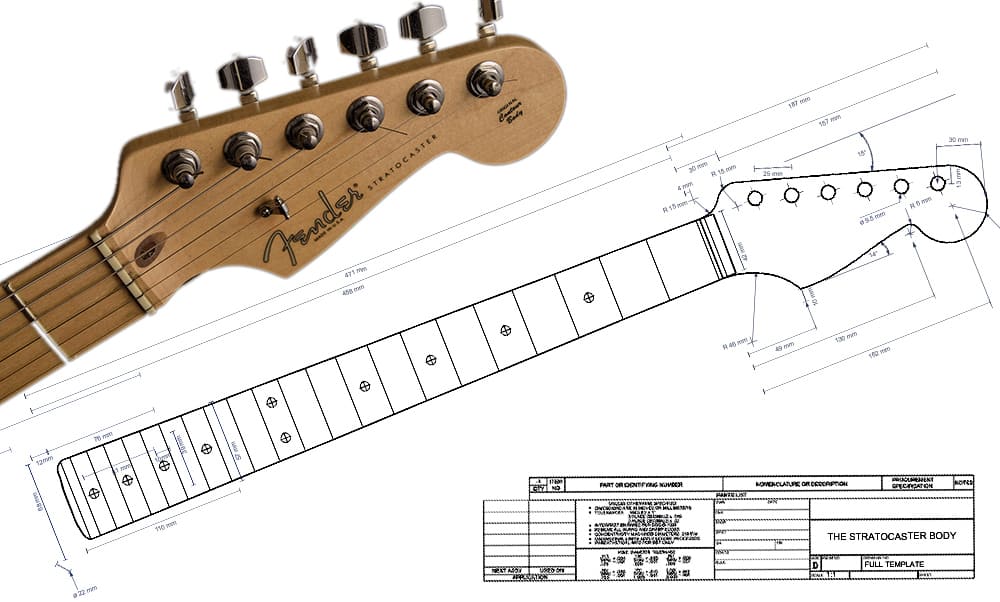
Using Templates and
If you are building your first guitar, a template is not just a good aid, it’s practically a must. It’s your ‘practice run’ and chance to make mistakes on cheap MDF instead of hardwood. If you are planning on making more than one body or neck of the same shape, a template will insure consistency. Templates from plywood, MDF or Acrilic can be found online, but making them is fairly simple and will be a great starting point for the guitar itself.
Creating your own Templates
To create a template, print or create full size plans of the parts you want, cut it and paste it on 10mm MDF and cut around the outline with a band saw or a jig saw, and sand it to the exact outline and perfect smoothness, Any jaggedness will be copied to the guitar. Create any holes you plan to rout for the cavities. You should check for irregularities with your fingers for dips and bumps. You may need separate front and back templates for holes and cavities which may overlap. Transfer the template onto another MDF template and join both templates, cut the edges again so both templates have the same shape.
Chamfer or Round-over Bits
Naturally used to round or chamfer the edges of the body for guitars like Strats. Can also be used, with a larger radius, for getting the neck back into a rough ‘U’ shape and manually refine it from there. Using a table mounted router would be the preferred method here as well. Make sure you tune the depth correctly. If the bit protrudes too far, you will get a little step on the top part and the roundness will start too low,. If its not far enough, the radius will not be fully rounded. Best to try it on a piece of scrap wood first. There is no ‘Undo’ button on routers.
Straight Carbide-Tipped
A must have for routing the groove for the truss rod. Preferably used with a guide or a jig. Make sure the diameter matches the width of the truss rod, start shallow and slowly deepen it until you reach the desired depth. A hand-held router would work better here.
Rabbeting Bits
Useful for two things: Binding and Flush covers. To get that little ledge where the body binding in guitars like the Les Paul. Fit the bit with bearings that leave just the thickness of the binding. The depth should be adjusted accordingly. For the back cover in the same guitar use smaller diameter bearings to get enough space for screws. The depth here should match the thickness of the cover you will be using.
Handheld routing VS. Table Routing
Whenever the job allows, a table router or a table mounted router would be my first choice. Hand held routers on the other offer mre freedom of motion and unless you are working on an edge, enable seeing the work. There are are also different size of hand-held routers and personally, I would prefer the smallest one which will get the job done, a matter of comfort.
Warning: Routers are the fastest rotating power tools in most workshops and demand caution and respect. A router can damage wood (or a hand) very quickly and effortlessly. A few ground rules to adopt when using a router:
- Unplug the router when changing or fastening bits.
- Turn it off when not working (even for a bit)
- Always wear eye and ear protection, preferably gloves.
- Have a firm grip at all times, some routers have a ‘kick’ when starting and may fly off when hitting a hard spot or nail.
- Always be aware of the grain and routing direction
- Go Slow
Routing Direction
This can be a bit confusing at first but has great bearing on both safety and the quality of the outcome.
Routing direction: Hand held routers rotate clockwise and if you flip and mount them, counterclockwise. The direction of your routing should always be against the rotation. Feed the wood from the right to the left on a table router, and rout from rout from left to right with a hand-held router. In other words, you should feel resistance when routing and not as if being pulled to or by the router.
The wood direction: Always rout with the grain of the wood. This is not an issue if you are exactly parallel or perpendicular to the grain, but when the grain is at an angle. This gets a bit tricky when routing the outline of a curvy guitar body as you are going to shift angles constantly. Don’t try to do it in one motion. Rather divide the outline of the body to several smaller sections for better control.
The table router is safer in many ways as the hand router can slip while you are working with it. in other words, the table router is less dangerous and easier to use especially for some types of construction.
Router Tips
- It is better not to store routers together in a bag, they may damage the blades and your fingers when trying to pick one out. Drill ½” and 1/4’” holes in a piece of scrap wood and stick them upright in them.
- Live only a couple of millimeters (1/32”) when cutting around a template. The less material the router has to deal with, the easier and more accurate the routing.
- You can use a straight bit to get a straight square angle on the edge of a board (same a jointer does) by running it with as ‘straight edge’ as a guide.
- Always test a new bit on a piece of scrap wood.
Expensive vs Cheap Bits
High quality Bits can be ridiculously expensive, but as with most tools they are worth it, especially in the long run. The cheap ones will wear out much faster (the quality of the material) and their bearings may fail sooner. However, the bits you only use a few times will still last you for years. On the other hand, if you are new to routing and like to experiment, buying a set of good router bits can add up to a price of the router itself. If you can afford it, don’t hesitate. My solution was to get a cheap ‘starter set’ for playing around and then upgrading just the ones I was actually using.
Additional Questions
How do you rout the neck pocket?
Routing the neck is a critical part and is usually the last part in the construction of the body. You want it to be in the right position, angle and depth, but you also want the neck to fit snuggly in it with no wiggle room what so ever. One of the foolproof ways of determining the size of the pocket, is to first position the neck in the right place, and building a template around by double taping scrap pieces of MDF around it. Than you remove the neck itself and are left with the exact positioning. Before beginning to rout you should tape one layer of masking tape to the inside of the template to tighten it by just a hairline and get that snug fit.
How can I mount the router to the table?
The base plate of most routers is connected with four screws. You can purchase, or make one yourself, a larger plate which will be fitted to a table. You can find generic base plates from plastic or aluminum made for just that. Some will also come with other guides and accessories. In the long run, if you are using it a lot you may want to purchase a dedicated router for the table, or upgrade to a new one and leave the old one there. The mounted router needs less of the fancy features such as soft start or the plunger.