

When building guitars one of the important factors is accuracy. If you are making multiple guitars or copies of a specific guitar that accuracy will also need to be consistent. Whether you are a professional guitar builder, a hobbyist or a complete novice templates will make your life much easier. If you are going to build an electric guitar, chances are you will also be making your own template (and you should).
How do you go about making a template for an electric guitar?
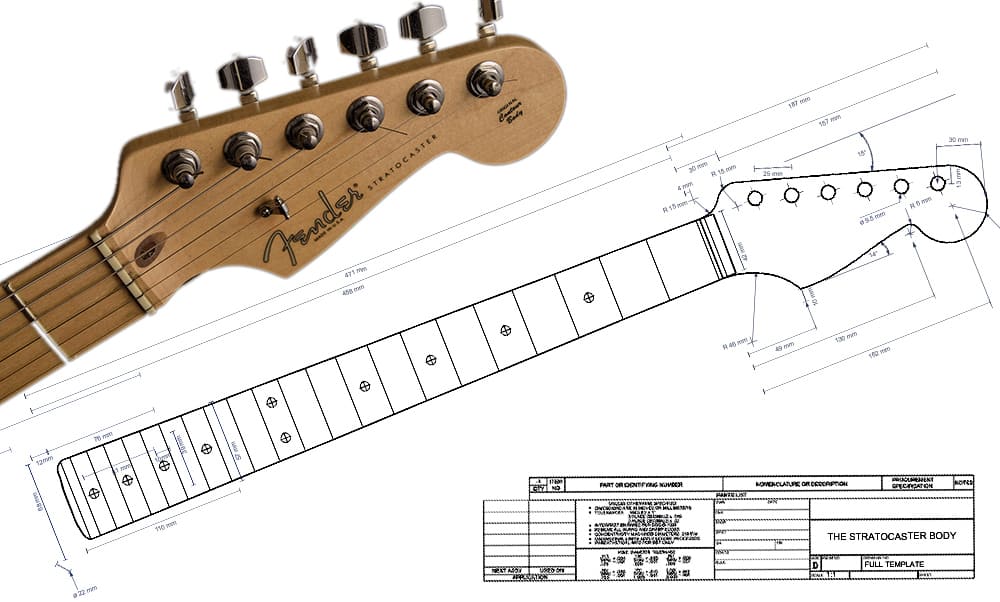
- Planning, drawing and/ or printing a full-scale drawing.
- Cutting sanding and finishing the base template.
- Retracing and creating your master template. (Optional)
- Creating ‘supporting’ templates
In this article I will try and go over all the steps, methods and considerations for creating templates for electric guitar building. You may just want to make a single guitar, a small collection or setting up for what might become the next custom guitar shop. Whichever route you choose, you should find some valuable information here.
Where do you start?
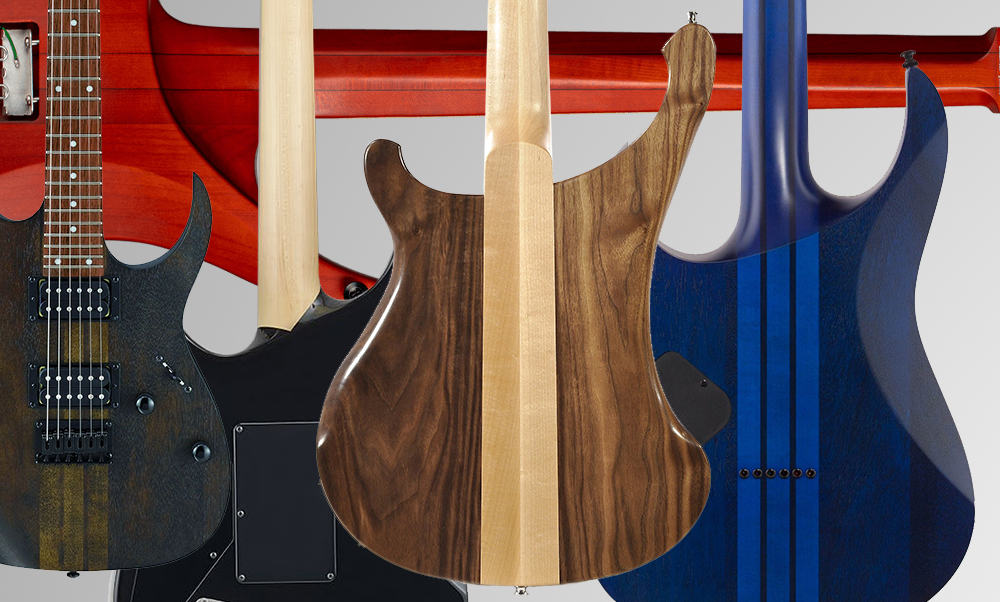
The first thing to do is make some decisions regarding the design. What type or shape of guitar, what type of neck, headstock and pickups do you want? Are you going for a classic, vintage model or do you want a unique, cutting edge design? These are all questions you would want to answer before cutting anything.
If you are going for a Standard American Stratocaster, a classic Les Paul or any other popular model, you can easily find a drawings/ plans for it online, either free or for 10$ or so. You can find a complete template on Amazon for somewhere between 45$ -65$, but what’s the fun in that. If that is the guitar you want to build, you can skip to the Printing part.
What about originals?
If your dream guitar is an original, it’s time to get planning. Making sketches of outrageous body shapes is all good fun, but when we talk about templates it has to be done in scale and some consideration have to be taken into account for the guitar to also be functional. Planning out the whole guitar and parts in scale will give a great understanding of where you are going and will in many cases point out potential problems that are much easier to solve on paper (or screen) than on wood.

Scale length and the number of frets
Are you going for the Gibson 24 ¾ “ scale, the Fender 25 ½ “ scale, something in-between, or something different altogether like a kids guitar of 22 ¾ “ (See “Why Not Build a Badass Electric Guitar for your kid?” ) .Whichever you choose will require its own template and will also interact differently with the body and the pickups. If you want to have a 24-fret neck, you will need to take into account the position of your neck Pickup which will be pushed towards the bridge and will both give a slightly different sound, and need different positioning and routing than the same guitar with only 22 frets. The type and number of pickups also makes a difference, humbuckers will not fit in holes routed for single coils and if you decide on one, two or three would make a difference too, both in size and in spacing.
Once all these considerations have been taken into account make sure you have incorporated them into the design, in scale. Whether you prefer working on any CAD or graphic software, do make sure it has the option of working in scale, otherwise it’s just a nice drawing and not something you can really work with. If you are going the old fashion analog, pencil and paper route, no problem, just work accurately and in 1:1 scale. Some people draw the plans directly on the MDF.
Create multiple templates as necessary or to your liking
The body outline is simple enough, but if there are cavities to be routed both at the front and back, and especially if they overlap, you will need a separate front and back template. For example, any guitar with a tremolo system will need that. You will need a separate back for the neck cavity as well.
Printing out your Template Design
Ideally you will have access to a plotter or a printer large enough to print the whole guitar on one sheet, preferably on heavy paper. Heavier paper will not fold and bend easily and just make life a little easier. It’s also good practice to make a few copies so you can cut If all you have access to is a standard printer with ‘Letter’ or A4 paper, worry not, there is an easy way to work around it.
Printing in ‘Poster’ mode
If you want to print in a printer that cannot fit the whole guitar on one sheet, the first thing to do is export you plan to a high-quality PDF file. When you open the PDF file and try to print, there is a tab in your printer properties page called ‘Poster’. This tab will allow you to tile the image and create a puzzle of your guitar image. Make sure the ‘Tile scale’ is 100%.
Also make sure the check the ‘Cut Marks’ box, this will create little hairline X at the four corners of each page and allow you accurate alignment. Depending on your layout and printer and size of paper, you may end up with 2- 10 pages printed. After printing all the pages, line them up and tape them together. You can cut the margin on one side of each page (where the cut lines are) to allow for the lines to continue without breaking from one page to another.
From Paper to Template
Organizing your papers.
At this point you should have a few printouts or drawings of your guitar and its time to cut them according to the templates you want to have. You will surely want the body outline as one template. You can have the cavities for pickups and electronics on the same template, or on a completely different one, and if you have a neck template you can ad this to the front or the back. Many Luthiers prefer to only route the neck after you have the neck ready, to allow for a more accurate fit. Inn that case you will make a temple from (a Negative of) the neck itself. You can also make separate templates with different combinations of pickups and spacing so you can later mix and match. If you do want to keep it simple, put the pickup cavities and any other parts that are in the front on the front template and the back cavities on the back templates. If you have a tremolo bridge in your design, you will have (different) holes in both front and back.
With most guitars you should end up with two pieces for the body and one for the neck and headstock. You may want to separate the neck from the headstock if planning on a scarf-joint.
Which material is best for templates?
Acrylic sheets are probably the best. They will last for a lifetime, durable and also look cool. However, they are relatively expensive and unforgiving when it comes to mistakes. If you are planning to make a lot of guitars with the same design, this may be an excellent choice. Most people (professionals included) will gladly ‘settle’ on MDF. MDF, despite the nasty dust it gives when sanding and routing, is a great material for templates. It is relatively soft, yet hard enough, and gives a great smooth finish. It is also relatively cheap so when you mess up a template (expect to mess up a few), you will not be torn up about chucking it away and doing a new one. Most other materials will not give you the flat smooth finish from a Template. Particle boards and cardboard should definitely be steered away from and laminated sheets can be an option but only if you can get your hands on very high-quality ones with no spaces between layers. When the router finds any of these spaces, it will make a kink in your guitar and it was all for nothing… Your best choice is probably 10mm to ½” MDF, although there are some benefits to thicker ones.
Cutting the Template
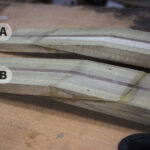
After you trace your paper to the MDF and clearly mark your center line use a band saw or a jig saw to cut the outline close to the line. A thin band saw will allow you closer and cleaner cuts and will save a little time sanding. After cutting, sand the edges to where needed. The one important rule for sanding is to maintain a straight edge. The best tool for that is the oscillating spindle sander in combination with any standing belt or disk sander for the straight parts. The benefit of both these tools compared to any held sander is that they always maintain a straight angle. You can still do all the sending manually and work out all the bumps and kinks left by the saw. If your edge is very smooth but not exactly straight, you can easily copy it to another piece of MDF just as you would to your guitar body itself. Some luthiers would make another copy in any case and make it their ‘Master Template’ to never be used on a guitar, but instead to make a fresh MDF template for every few guitars they make. If you want an Acrylic template, this would also be a good point in time to route it from the template you just made.
TIP: Spray the edges with clear polyurethane for template longevity. Another option is to use diluted carpenters glue solution (about 50% water) and paint the edges.
How to use the template?
Take your selected slab of wood after it has been planed and glued to the right size, mark the center line and align the template to it. If you are happy with the position, attach the template to the body will double sided tape. You don’t need to cover the whole surface but put a few nice strips, so it doesn’t move when routing.
TIP: An alternative to double sided tape (if you hate taking it off afterwards) is using masking tape on both sides and gluing the backs of the masking tapes to each other with super glue. The masking tape will be strong enough and will come off easily.

Time for Routing
The preferred router to use with templates is a table router. The table router’s advantage it mostly in the fact the it will always maintain a straight angle whereas a hand held router can sometimes slightly tilt sideways and dig into the wood where it shouldn’t. If you don’t have a table router (or an improvised one) you can use a hand held one but you will have to be more careful.
The router bit we need here is a ‘Flush Trim Bit’ AKA Template Copier. This bit has a straight rotating blade which is aligned with a bearing wheel. The most straight forward one to use has the wheel close to the shank and then just set the bit so the wheel to be at the closest part to the router body/ table. The template should be closest to the router body/ table and then just press it to the template and follow along the edge.
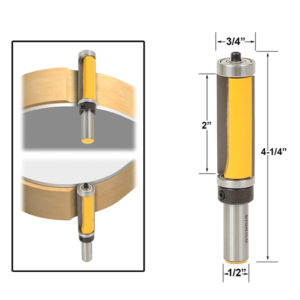
They also come in different length and diameter and you need to make sure the shaft matches your router. Much more on ‘Flush Trim Bits’ in another article.
Routing direction
Routing direction can be critical for two reasons: Safety and wood chipping.
Safety: You must always feel like you are pushing towards and against the direction of the router. If you are using a hand held router and holding it up right, the blade is rotating clockwise. If the edge is in front of you would want to rout from left to right, pushing against the rotation of the blade. If you go with the rotation of the blade, it will seem easier but there is a good chance you will lose control and the router will pull you with it. This is called a ‘Push-Cut’ is the preferable for safety reason. If you are working on a table, you are holding the wood and not the router and the blade is facing up, rotating counter clock wise. In this case the ‘Push-Cut’ will be from right to left. If all the directional rules are confusing, just remember it should feel like you are pushing and not pulling (definitely not being pulled). In any case make sure your blade is properly secure and if using a hand held router, make sure your materials are properly clamped down. If using a table router remember to hold your wood firmly.
Wood direction
When routing wood, especially with irregular shapes like a guitar body, there are times when you will find yourself cutting against the grain of the wood and in these cases, you may have to stray from the ‘Push-Cut’ and do a ‘Climb Cut’ to avoid wood chip-out. This can be worse with softer woods and longer grain. Since this is less safe, you should approach it carefully and work with short distances at a time. Routing the full circumference of the of a guitar body safely may involve changing the direction of routing in order to avoid tear-out and chipping. You can mark the direction of each section you want to rout on your template. We still want to try to be ‘Push Cutting’ in the areas where tear-out is not a concern.
The same principals apply to routing the headstock and the neck itself.
A few pointers as a conclusion
Templates are a great way to improve accuracy and maintain consistency.
Templates are a good place to make the mistakes you would have made on the guitar itself.
The more you sand and smooth the template, the smoother your outcome will be.
If you are not handy with a router, exercise caution, work slowly and test as much as you can on scrap wood before jumping on the expensive stuff.
Have Fun and Experiment.