
You decided you want to build an electric guitar. You are confident enough to tackle the body, and you don’t like the cheap electronics that come with most kits (or you have an eye at a set of top-notch Seymour Dunkin pickups). There is just that thing with the neck.. You want to do it from scratch but, maybe on the second or third guitars. On the other hand, most kits or pre-fretted necks come with a mediocre finish on the neck and would not match the awesomeness of the rest of the guitar.
Good News, you can get a pre-fretted neck of your preferred style, or even a blank (paddle) headstock, and give the full makeover to a custom shop finish. The process is very straight forward and requires only some basic Lutherie tools. I will break it down for you, step by step until we get there. And since you are giving it an ‘overhaul’ anyway, and treating whatever you get as ‘raw material’, the original quality of the fret-work is secondary.
Why is the neck so important?
If you’ve been playing guitar for a while, you know that some guitars just feel right the minute you start playing and some just feel awkward. Of course, everyone has their own preference and habits, but in most cases it’s the comfort of the neck that makes the difference. The sound is largely affected by the pickups, and can be enhanced with a good amplifier, pedals and effects. All these can easily be changed or replaced. On the other hand, the playability, the comfort and even the speed are directly affected by the neck and the frets. Smooth, even frets will not Buzz, will demand less pressure and will allow easier bends. Changing The neck is like changing a guitar.
Where should I get it from?
Chances are, when shopping for the lower end of the price range, that it originated in China. That does not necessarily reflect on their quality as Gibson also makes most of their budget guitars in China, but if you buy directly from Chinese websites such as Aliexpress or Banggood, shipping times may be a bit more ‘fluid’ than from a more localized warehouse. If you are in no rush, you may even be able to get better bargains there and save a few dollars.
If you do want a slightly better neck and service, you can find a nice range of shapes and prices at the Canadian based solomusicgear.com. Aside from the necks, they also carry all the tools and accessories you may need for building the rest of the guitar.
For even lower prices you can go to a more general store that has a surprising range of electric guitar necks at surprisingly low prices. Tomtop.com
You can also check out Amazon or eBay for bargains, but do take into account shipping times as a lot of their suppliers, ship from China as well.
The work ahead of us is comprised of a few parts:
Checking the neck and frets for inconsistencies and height differences
- Leveling the frets to the same height
- Re- crowning the frets
- Finishing and polishing the frets
Each of these steps has its own set of tools and ‘does and don’ts’. We’ll go over each step, look at the different tools available and the different techniques used to accomplish it. As with any craft Luthiers have their own preferences, methods they swear by and whims. I’ll try to give as broad as possible view relying on what I have gathered and my own experience.
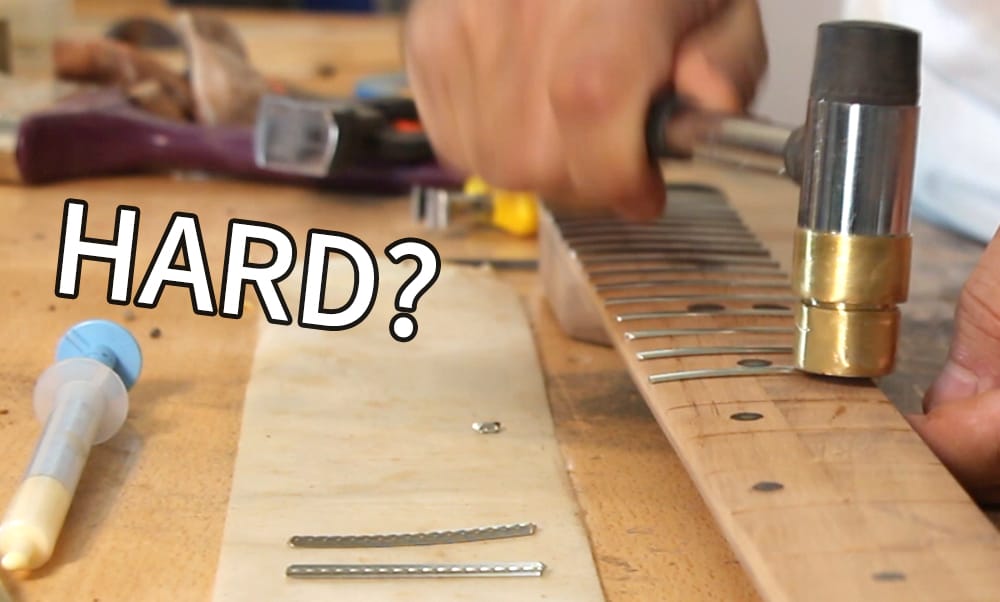
The Package has arrived
You have stripped away the packaging, run your hands along the frets and if no one is around, play a little air guitar. Time to get started…
Checking the neck
The first thing on our list is checking if the neck is totally straight. You can first just take a look along the edges of the fretboard to get a sense of it, but the actual test is done with a Notched Straight Edge. Remember, we are checking how straight and flat the fretboard is, meaning the wooden part
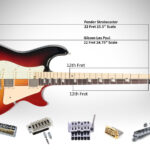
and not the metal frets. If you just put a straight edge ruler on the fretboard it will give you a sense of how flat the frets are and not the fretboard itself. You will want that at the end of the process, NOT now. A Notched Straight Edge has notches matching and ‘skipping’ the exact position of the frets. Most Notched Straight Edges have two different sides to match the majority of guitar scales. The ‘scale’ of a guitar is the length between the bridge and the nut where the open string is stretched. The total scale length would affect the spacing of the frets. One side would usually fit a 24.75” scale, typical of most Gibson guitars, and the other side would fit a 25.5” scale, typical of Fenders.

Trivia Tidbit: Gibsons had many slight variations over the years and with different models and manufacturing equipment, but were mostly within 3/16” of the now common 24.75” scale. Fender were more consistent and other than a few models such as the Jaguar and Mustang which were significantly shorter, their flagship models, Stratocaster and Telecaster kept to 25.5”. Contrary to common belief the scale length is the main difference in tone between Gibsons and Fenders and not the pickups or wood. The shorter scale will slightly lower the tension of the strings, enable easier bending and produce a warmer tone.
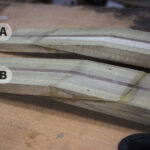
Lay the neck on a flat (padded) surface and put the Notched Straight Edge on the fretboard in so that the notches perfectly align with the frets. Take a look at the area where the edge meets the fretboard at eye-level. You want o have a light behind the neck to better show if there are spaces between them. If the lower edge is absolutely flush with the fretboard it is straight. If the edge is touching on the sides and slightly lifted in the middle you have an ‘up bow’, if the middle is touching and the ends are in the air, the neck has a ‘Back bow’. Most necks will have a slight ‘up bow’ which how most guitars and guitarists set up the guitar. Regardless of high an action you prefer when playing, you will need to straighten it for the purpose of fret leveling.
Eliminating Neck ‘Bow’
Straightening or flattening the neck is synonymous with ‘adjusting the Truss Rod’. There are a few types of truss Rods, but the all perform the same function: bending the neck back and forth. In order to flatten an ‘up bow’ you need to tighten the Truss Rod. In order to flatten a ‘Back Bow’ you need to loosen the Truss Rod. The good old ‘Righty Tighty, Lefty Loosey’ will do the trick.
Different Truss Rods come with a variety of interfaces for adjustments. From what I have seen most Chinese necks will fit a 5mm Allen Wrench, but Hex Nuts and X Slotted Nuts are also out there. In most necks the adjustment is made on the headstock side, but some (mostly older models and Acoustic guitars) may have it on the pickup side. Most reputable guitars will come with the correct Wrench to fit their Truss Rod, but chances are lower with a neck you got under $50.
Trivia Tidbit: We have Gibson to thank for the Truss Rod. When metal strings were introduced, necks started deforming and the need for reinforcement became evident. A few attempts were made by Companies such as Martin and Washburn using Ebony wood, a steel T bar and even a rectangular steel bar. In 1921 Gibson patented the first adjustable truss rod and guitar necks were never the same. The first 50 Fender Esquire made in 1950 were made without a Truss Rod, for cutting costs, but due to demand Leo Fender went back to the drawing board and created what evolved to be the Telecaster (Truss Rod included)
4 Tips for Easy Truss Rod Adjustments
- Always start by slightly loosening the Truss Rod, even if you need to tighten it. It will give you a sense of how difficult it is without having to use too much force, and loosen the nut if it’s a bit stuck.
- Mark the truss rod with a sharp pen before moving it. A little turn goes a long way, you want to know where you started.
- ALWAYS loosen or remove the strings before Truss Rod Adjustment. (Tip 1 will save you if you forget)
- Start with small increments of rotation and check with the Notched Straight Edge. An 1/8 of a turn may be all you need for a slight bow. Once you achieve a perfectly straight neck and fretboard It’s time to move on to the frets.
perspective). Therefore, you will need to check fret by fret and check it for it’s relative height in relation to it’s neighboring frets. To achieve this we have nifty little tool called a ‘Fret Rocker’. The Fret Rocker it essentially a straight edge ruler sized to cover the length stretching over three frets at a time. Since the spacing between frets changes, most Fret Rockers have four edges of 1 5/16”, 2”,3” and 4”, to fit any area on the fretboard. Simple put it on every three-fret span and try to ‘rock’ it. If it rocks, the middle fret is higher then at least one of the other two. Since we can’t lift the lower frets, only reduce the high ones, we are going to be marking all the high spots.
Start from one end of the neck, (let’s say the nut side) put he rocker on the fist second and third frets on the High E side of the fretboard and rock it. If it rocks, take a permanent marker and mark the fret top in that are (the lower third of the fretboard). Repeat this on the same frets but in the middle of the fretboard and again in the Lower E string side. If the second fret was consistently high in all three areas, you should now have the crown of the fret all marked. If only a part of was too tall, only that part should be marked.
Now move one fret down and repeat. If you have a 22 fret neck you should have to rock your rocker (22-2 times 3) 60 times to cover the whole neck. No there are no shortcuts here! Get yourself in a comfortable position, have your neck positioned at eye-level and rock it.
Trivia Tidbit: 22 Frets have always the standard for Gibson Guitars. Fenders used to be 21 frets till the 1980, when they switched to 22 as do most guitar makers. Ibanez’s and Jacson’s ‘SuperStrats’ as well as the headless Steinbergers come with a full set of 24 frets. Two Octaves on every string. Steinbergs actually has 25 frets as it has a ZeroFret.
Once you are done, all the higher frets should be fully or partially marked, and you are ready to start Leveling them. How meny of the frets are marked is a good indication of the quality of the original fret work.
3 Precautions to take before you start leveling the frets
- Protect your fretboard. Before approaching the neck with any type of abrasive tool make you properly mask it. I prefer to do it even before ‘fret rocking’ to same me from slip-ups of the permanent marker. You can use different width of masking tape, or just cut along the sides of the frets with a scalpel or a very sharp thin blade. Make sure you cover right up to each fret, you will need it for the ‘re-crowning’. Do be carful not to scratch the fretboard with the blade, (kind of defeats the purpose…) hold the knife et a very low angle.
- Remove the Nut. You don’t want it to get in the way or be damaged. Most nuts should just have a dab of glue holding them in place and a gentle tap sideways should remove it. Try and be gentle
- After marking all the high points on the frets I like to also mark the rest of the frets with a different color. This way I have an indication of when I have reached the lower level and should probably stop. Remember. You always want to remove only as much as necessary and not more.
Everything is marked and protected, time to choose your weapon of choice:
Leveling Beam.
Leveling beams are essentially a perfectly flat steel or aluminum profile with sanding paper attached to it. You can easily improvise it from an old level or pieces of scrap metal profiles with self-adhesive sandpaper or using double sided tape. But make sur it is perfectly flat. Aluminum profile tend to have a bit of an ark from side to side, so you may have to sand it flat first. They come in different lengths and grits. The 24” are a bit cumbersome and are mostly useful for a new or re-fretted neck. The 8” and 16” are handier for more localized work.
Leveling files.
They do the same job as the leveling beam. The upside is they don’t wear out, just need to cleaned and can last a lifetime. The down side is they do leave some grooves and chatter marks and have a single ‘grit’ level. Some people swear by them.
Wood or Aluminum Radius Sanding Beams.
Work the same way as a leveling beam but covers the whole width of the fretboard at once. The down side is that you don’t always want to sand the whole width of the fretboard. The added value comes with a new or re-fretted fretboard. You can sand the wood, use it to clamp the frets (only the aluminum) and sand the frets. It’ should definitely be great for a final finish, with high grit sandpaper, after rougher leveling with any other tool.
5 Guidelines to Leveled Frets
- Always use straight parallel strokes along the length of the neck. Diagonal motion may ruin the radius on the frets
- Don’t use force or pressure on the beam or file, let the weight of your tool and hand do the work.
- Take your time. You want to caress the frets gently and not force them brutally. There is no ‘Undo’ button
- If you are not sure of the right grit to begin with, start with a relatively high one. If it seems to not even scratch the surface, switch to a lower grit until you start to get results. After removing the majority of material needed, start moving back up to finer grits for finishing. The grit range is between 400 and 1200
- If some of the markings have been sanded and you are not sure where and how much more work is needed, just go back to the marker and the Fret Rocker. Sand and repeat
When done, do a final check with the Fret Rocker.

Re- crowning the frets
After sanding /filing the frets to absolute level you have flattened the once round top of the frets. In a well fretted neck, those might just be a few frets or areas, but in some cases, or if you sanded with too much enthusiasm, it may be a lot of frets.
What is Re-Crowning?
This is simply the process of giving the fret it’s original round shape whilst keeping the height it has.
- We want to bevel the sides of fret profile but not touch the middle as it is now in the correct height.
- The shape of the profile needs to be round and not triangular with a sharp tip on top
- Take care to have the highest point of the fret exactly in the middle of the fret. This is where the string bends and that is the intonation point of the fret.
- Be careful not to over-file the area in the sides of the neck and leave a thicker fret in the middle of the neck
There is an array of re-crowning files (Check the full list in the ‘Recommended Gear’ Page) from different materials, styles and sizes which can be divided into two main categories:
- Files the have an abrasive flat side to file the fret, and a smooth edge to run along the fretboard without damaging it.
- Files that have a concave groove, shaped and sized to match the fret profile. The abrasive material is in the groove
4 Simple Steps to Crown Perfection
- Mark the, now flat, top of the frets in need of crowning. You are aiming to file the width of the marking until you are left with a thin straight line of about 1/32” (1/2 mm)
- If working with a straight or triangular file, do not try and file it to in a radius but rather bevel the side at a 45-degree angle (outside the radius you want) and then the two smaller edges you have created
- If working with a designated grooved Fret File just follow the neck radius with smooth strokes and watch as the line gets thinner and thinner.
- When the Lines are thin and the frets are rounded, have another pass with a fine grit sandpaper to take out any edges left on the sides of the fret
- Check again with the Fret Rocker to insure you’ve done a great job.
4 More steps to Fret Awesomeness
Do another pass of filing to the tips, on both sides of the neck from top view. Round the tips. It’ll be smooth as butter when you run your fingers on it.
Take an 800-1000 grit sandpaper and gently go over the sides of the frets. This is not meant to actually shape the fret (that should be done), we are just removing the scratches the files left there. Try to avoid the top of the fret, although if you are gentle it shouldn’t remove anything other than the marker itself. A Fret Eraser with Lower Grit will also do the job but may remove more material- Caution.
Switch to a Fret Eraser with a high grit and just go over all the frets until they start to give a nice sheen.
Take a metal polishing paste with a clean cloth, spread it and buff it to a mirror shine. If you have a Dremel tool with a polishing wheel with polishing compound you will get even better results and as a bonus you could possibly also skip the Fret Eraser.
That’s it. You should now have a neck that can compare with any custom shop guitar and probably beat most standard guitars, but more importantly, you have great neck which will be a lot of fun to play for a bargain price.
Rock On