

For many people the shape of the Strat is almost synonymous with ‘guitar’, and if this is one of your first builds, you will find that there is a lot going on in this type of a body. Let me take you through the steps you need to build this classic body from pieces of timber to prepping for finish. I will also give options to accommodate different type of tools and experience.
So how do you shape a Stratocaster style body?
- Choose your timber and Prepare it for gluing
- Glue the wood to achieve a large enough piece
- Cut the rough shape
- Smooth the shape outline
- Rout the Pick-ups , Bridge, Tremolo (in the back) and Control Cavities
- Round the edge
- Sculpt the body contours for arm and body
- Rout the Neck Pocket
- Sand
There is a certain logic to the order I have chosen, which I will explain as we go along. Let’s start going through the stages and see look at the details and the options. I will try and cover every angle or question you which may raise.
So many choices
The Strat has gone through many variations to the Stratocaster. To the untrained eye there may only seem to be different colors and maybe neck types, but minor changes to the materials, dimensions, hardware and design have been continually made since the 50’s and I am not even including Custom Shop creations. I have a whole article dedicated to the Checklist of possibilities of any given guitar you want to build. You will want to pick a model or year, get the plans or a template for it, and continue from there.
Choosing your wood.
Without getting into the ‘tone-wood debate’ (which wood will give better sound/ more sustain etc.) you can either chose to go with the classic Fender timbers such as Alder or Ash, or other common woods such as Maple, Poplar or Mahogany. Since this is your build you can also decide to go with some exotic wood or swing to the other side of the wood spectrum and do a ‘Pinecaster’. Other than giving you a slight difference in tone, there is often a much more evident difference when it comes to working with different types of wood. Heavier and more dense timber will be harder to work with, regardless of it’s tone. For amateur builders, price and availability may also be a deciding factor.
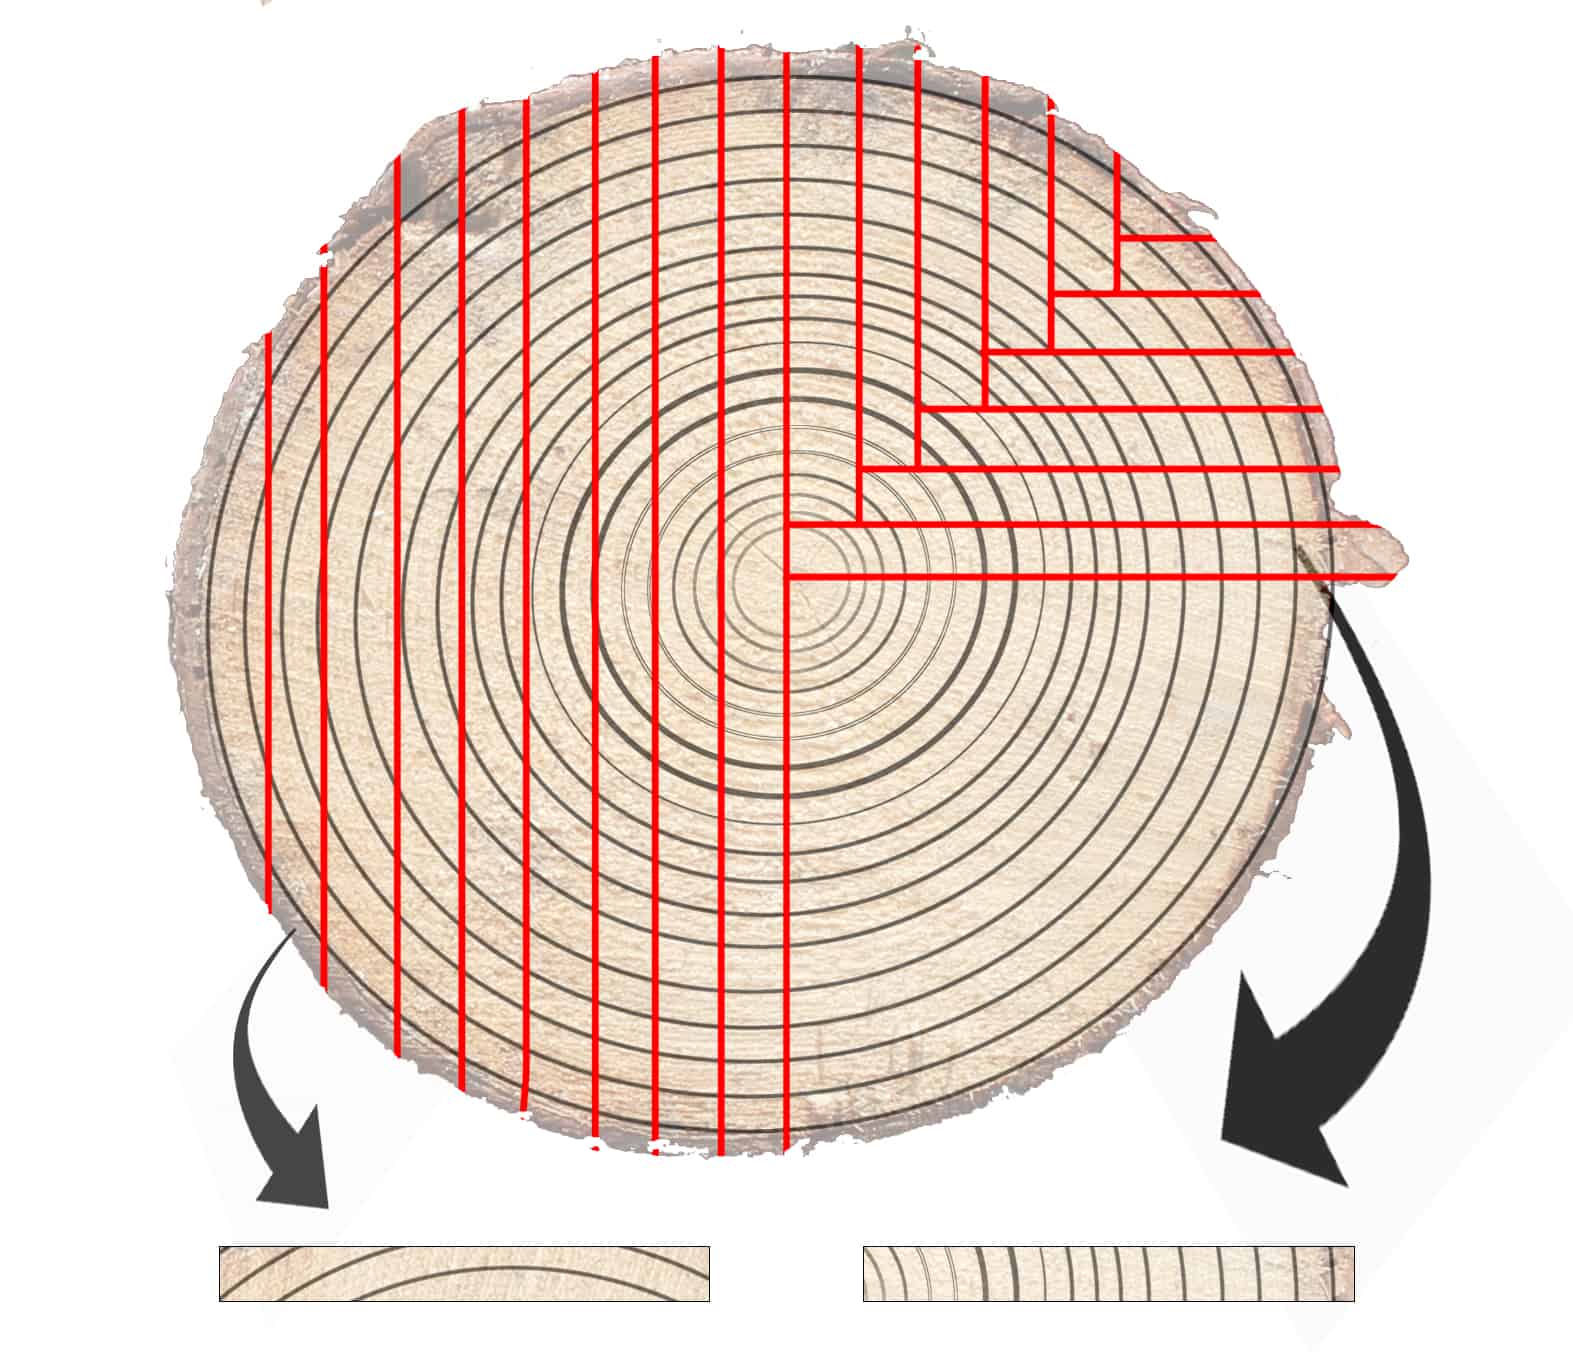
What is Quarter- Sawn Wood
When cutting timber in a mill there are a few types of ‘sawn’ types. The main different types of cuts will tend to deform differently over time and in reaction to humidity.
The difference can be seen on the profile showing the wood rings. In ‘Quarter sawn wood the lines of the rings will be very close to parallel to each other and almost perpendicular to width of the cut. This will give the most stable wood which will have the least tendency to deform, warp or arch. In any case it should also be dry enough to not deform any further. Freshly cut timber is not a good choice for instrument building (or most types of carpentry)

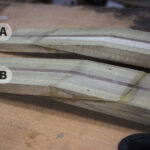
One, Two- or Three-Piece body
Most Fenders (and solid body electric guitars in general) are made from two pieces of wood glued together along the centerline. They may also be book-matched or at least from the same piece of wood. This makes it stronger and more stable than a one-piece body and is much more practical to source. If you have thinner planks, it is also possible to glue three or parts or even more, up to a point of making a multi-laminated body, but that’s a different story.
Alternative option may be a through neck design, where the neck actually continues through the whole length of the body. In this case you will only need to add two ‘wings’ above and below the neck, to complete the shape of the body.
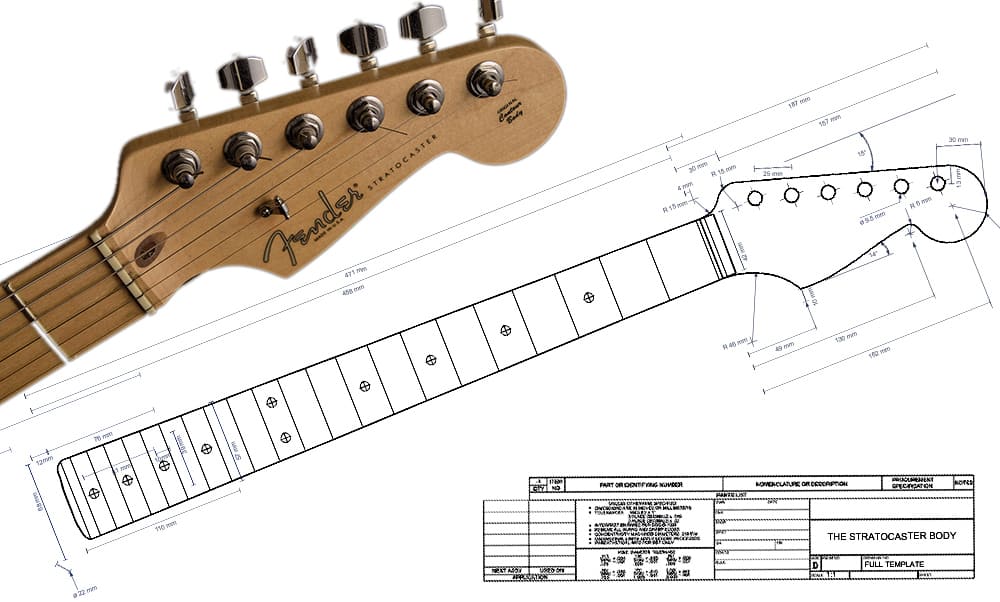
Size Matters
The run of the mill 60’s Strat body is 461mm/ 18.1” Long and 323mm/ 12.7” wide. They are also 44.5mm/ 1.75” thick. When planning the guitar, and depending on the tools you have (you may want to do the very rough cutting in the same place you get your timber), you will want to accommodate these dimensions while living a little extra for planing and sanding. Running your wood through a planer for reducing and evening the thickness is often easier before gluing.
Prepare the Wood
Before gluing the two pieces, you will want to make sure of two things: First, you want the two pieces are flat and the same thickness. Second is to have a straight 90 degree angle between the top and the sides you want to glue, so that you will get a flat uniform surface afterwards. This will also minimize ‘slippage’ when tightening the clamps. This is most easily achived by first using a jointer on the glue receiving sides to get the 90 degrees and then planing the thickness as much as desired. A hand planer with a good straight edge and a straight angle rule can also do the job.
Glue the wood to achieve a large enough piece
Before clamping, apply a generous amount of glue to both sides. There is no need to overdo it though. A thin layer on each side will be enough, but you want to cover all the area and have enough so some will squeeze out when tightening.

How many clamps are too many?
When clamping the two pieces you may want to add a couple of clamps to keep the vertical aspect level as well. There will often be some motion when you start tightening the main clamps. Tighten them a little and then add a couple to correct it. Then go back to the horizontal ones and tighten them. For the length of a Strat body, four clamps should be more than enough pressure and considering the width of the glued pieces there shouldn’t be an issue of spreading the pressure. I will usually put two on the sides, when everything is held together tight enough to avoid any more motion, I’ll add a third one in the middle and then number four and five right between them. Probably overkill, but everyone does it. Depending on the glue manufacturer, most will be dry within a few hours, but I just leave it overnight. Wipe the excess glue with a wet rag or just leave it and scrape it later.
If you want to avoid glue dripping on the floor/ table or the clamps, use baking paper/ parchment paper to cover and protect. It will come off relatively easy when the glue dries.
Finish the blank body
After removing the clamps, you will want to get the surface flat smooth and even. If you have access to a wide enough planer, just run a few times on each side and you are ready. A thickness sander is also a good choice, especially if there is very little to remove. With a sander however, you will want to scrape the dry glue drippings off manually so they don’t clog your sander.
Mark the outline
At this point you want to either use a template (preferred), or draw the outline of the body. You will want to mark and pay attention to your mid-line and unless there is some feature in the wood that would dictate otherwise, this will probably be your gluing line. I go into much more detail on how to make your own templates in an article as well as a Video. Templates are great for both beginners and pros. As a beginner they allow you to make the little mistakes on a cheaper material and improve the chances of not damaging the wood. As a pro, they enable consistency and accuracy which are very hard to reproduce manually.
Cut the rough shape
Use a band saw or a jig saw to cut the outline as close as possible. A band saw will give a slightly smoother and straighter (vertically) cut. That may later also make life a little easier for the router. You may want to cut a few cross cuts, to get better access and easier cuts in those tight corners.
Rout the exact outline
After the rough cut, you will want to get the edge to the correct or exact line and smooth the outline. If you are hellbent on not using a template, you can skip this part and just start sanding, but it much easier and more accurate to use a template and rout it. Attach the template to the body with either double sided tape of your choice, or (my personal choice) use masking tape on each side and superglue them back to back. This is where a router with a flush trim bit will simply remove that little bit you left around the line and leave you with a nice smooth edge in the exact dimensions of a Strat. You can rout this on a table router, or a hand-held router. You can also do it with one long blade, or with a shorter one with two or three passes. In any case, you should be mindful of the routing direction to avoid chipping. If you are not familiar with the principles of routing direction, there is a more in-depth explanation in an article and a video I made.
Smooth the shape outline
If you have’ or made a nice smooth template, and your routing came out perfect, there may be very little work for you here. However, before rounding the edges, you will want to go around the side and make sure there are no bumps or steps as the will transfer and become very evident after the rounding. Depending on the type of wood and the quality of the routing, you want to start sanding with a grit of 60 – 80 and work up to about 220. Use a spindle sander for all the concave parts and any other flat sander for the rest. The one thing to lookout for is to maintain a straight 90-degree edge. If you are sanding manually, use a block or cylinder of sorts (a piece of broom-stick or even a drill bit) to be able to maintain that straight edge. Don’t spend time on the edges, we are going to round them, spend your effort on the middle 2cm or ¾” of the thickness.
Rout the Pickup , Bridge, Tremolo (in the back) and Control Cavities
I prefer Routing the front and back before rounding the edges, because it leaves a bit more surface which makes routing it a bit more comfortable, but if you have good templates and router, the order is not critical. For straight up Strats you will need one template for the front and one for the back. If you make them yourself, do make sure they are accurately aligned so the bridge and the rest of the tremolo system align.
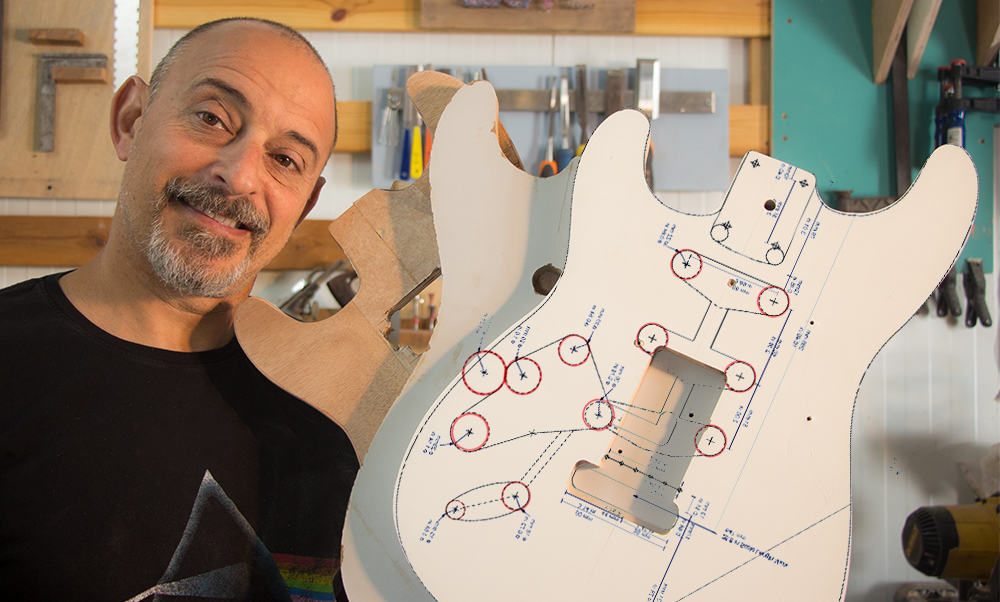
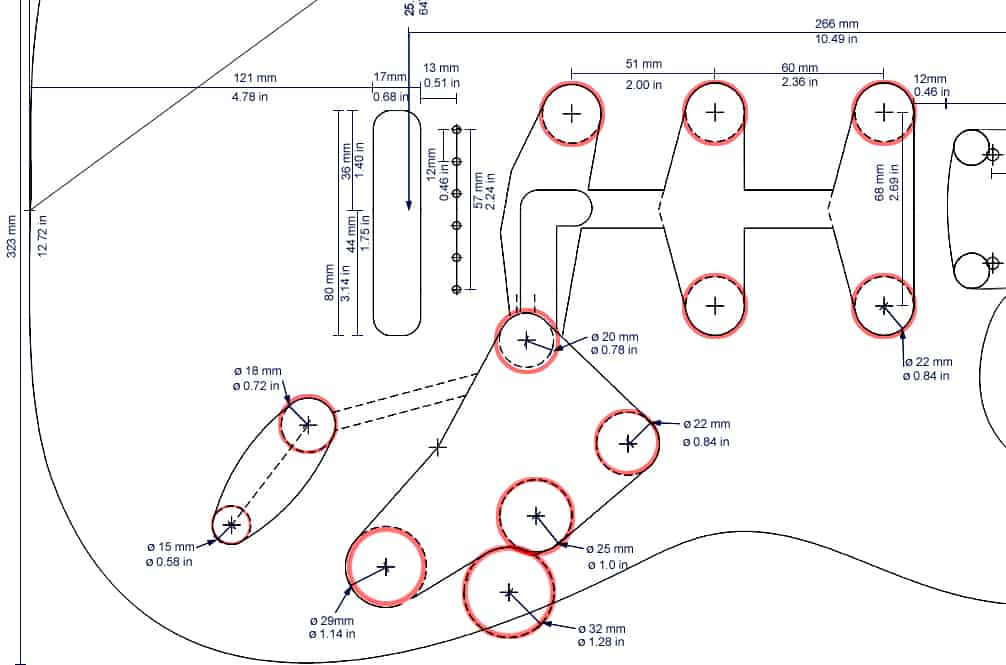
Creating the cavities without a Template
There is a lot you can do here with drill bits before starting to work with a chisel. All the cavities have their diameter shown in the plans and drilling in the right places (and depth) will give a very good start for both the pickups and the rest of them. A 22mm or 0.84” ‘Forstner bit’ drill will take care of the correct radius for the pickup cavities themselves. You will then need to rout with a straight edge between the holes, or chisel it out manually. The same goes for the rest of the cavities, using a variety of other diameters.
A few Pointers for the Cavities
- Whether using a template and a router or not, it is always easier to remove the bulk of the material with a drill first. A Forstner Bit on a drill press will give the best results, but a hand drill will do as well
- Be very mindful of the depth you are routing/ drilling. You do not want to hit the tremolo cavity in the back
- Try and have all the pickups and hardware before routing. Even original Fender parts vary in sizes.
- It is good practice to check that the pickups you are planning to use, fit the cavities you are planing.
- In Strats there is a large pickguard to hide little mistakes, if the pickup slots are a bit oversized, it will not be visible.
Rounding the edge
Most Fender Stratocasters have a ½” radius round edge. A ½” Round-Over Router bit is exactly what you need. There are a few older models which have a 7/16” radius, so if you are very particular about it, get the correct one.

You can rout the edge with a hand-held or a table router.
Round-over Bits will have a ball bearing which will run along the edge and guide the rounded blade. This is why it is important that edge is as smooth as possible, and has no bumps or creases. It is fairly safe in the sense that it is easy to work with without the risk of damaging the guitar, or yourself.
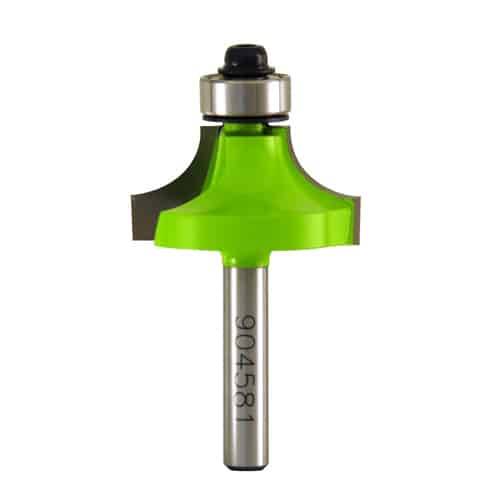
Using Round-Over Router Bits
You do have to make sure that the depth of the bit leaves the tip further from the bearing, flush with the base or the table. Unlike the flush bit where you can choose the right direction for the grain, the round-over bits can only be worked on in one direction. Therefore, you will need to pay extra attention in places where you will be routing against the grain. In these places you may need to work is small increments, slowly taking small ‘bites’ until finishing each section.
Sculpt the body contours for arm and body
There is no real trick here and, in most cases, you will need to draw the target lines for both the arm area and the belly/ rib contour, and start removing wood until, you reach it. We are going to ‘lose’ the round edge we have just created in these areas. This can be done with any type of rasp, file, sander or plane. Depending on the tools you have and your comfort working with them, you may choose to accurately, slowly and manually file and plane those contours. Slightly more aggressive will be a variety of rougher rasps.
The Japanese Saw rasp is a favorite among Luthiers and will remove large amounts of material in relatively short time. (It also works well for neck sculpting). If you are more comfortable with a grinder, a rasp disc will be the fastest way to remove large amount of wood and get the bulk of the work done. You do need to be carful with this one as a slip can put some nasty gashes on whatever it touches.

After the removal material with a rougher tool, you will switch to finer and finer planes and files until you reach smoothness that requires sand-paper.
Routing the Neck Pocket
You want the neck pocket to have a very tight fit and that is why when building your own you may want to wait with routing it, until you have the finished neck. Of course if you have a a good, accurate template you trust, you can finish the pocket earlier. Guitar makers who have precise templates and construction methods will have already routed the neck pocket at the same time as the rest of the cavities, but when it is single guitar being built, you want to be sure.
Customizing the Neck Pocket
A simple way to create a fitting template will start by measuring and placing the neck heel in (or on) the place where it should be and clamp it.
After that you will place flat and straight at the two sides of the neck and a third one at the end side. The Strat heel end is round, so you will want to copy the exact shape. After double taping these three pieces you can remove the neck and there it is. Again, you will want to remove most of the material by drilling before routing. Drill as mush as you can cover and just a hair from the final depth you want.
For extra tightness you can also put a layer or two of masking tape on the inner rim of the template, where the bearing of the flush router bit will run. This will make the template that much smaller.
About Sanding
Let’s put it on the table. Building guitars involves a lot of sanding. At this point all of the rough shaping should be done and we are leaving behind the more abrasive tools and moving to sandpaper. We are not trying to change the shape but merely refine it by removing the scratches left behind. We will start with low grit paper and move up. All sanding paper leave scratches, but the higher grits have smaller scratches. The principle behind sanding is simple. Every grit is meant to remove the scratches of the former while leaving smaller shallower scratches. You cannot jump up in grits to high as a 600 grit for example will not be able to remove the scratches and smooth a 100 grit sanded wood. You will need a few steps between them. Eventually they are small enough that the surface feels smooth.
The practicality of sanding
Flat surfaces can be sanded with an orbital sander and the outer edges with a spindle sander. Whether you are using mechanical tools or sanding completely manually, you want to keep the front and back surfaces flat. And the sides (the part between the rounded edge) straight as well. Depending on how smooth your initial shaping was, you will want to start with 100-200 grit. If there are any rough spots, you may want to touch them up with 80 or even 60 grit. These may be around the contours you have sculpted with rasps or rough files. Only after all the surfaces and the curves are uniformly smooth, move to 300 and 400grit. You may want to finish with 600 grit but in most cases anything above that is saved for finishing and polishing.
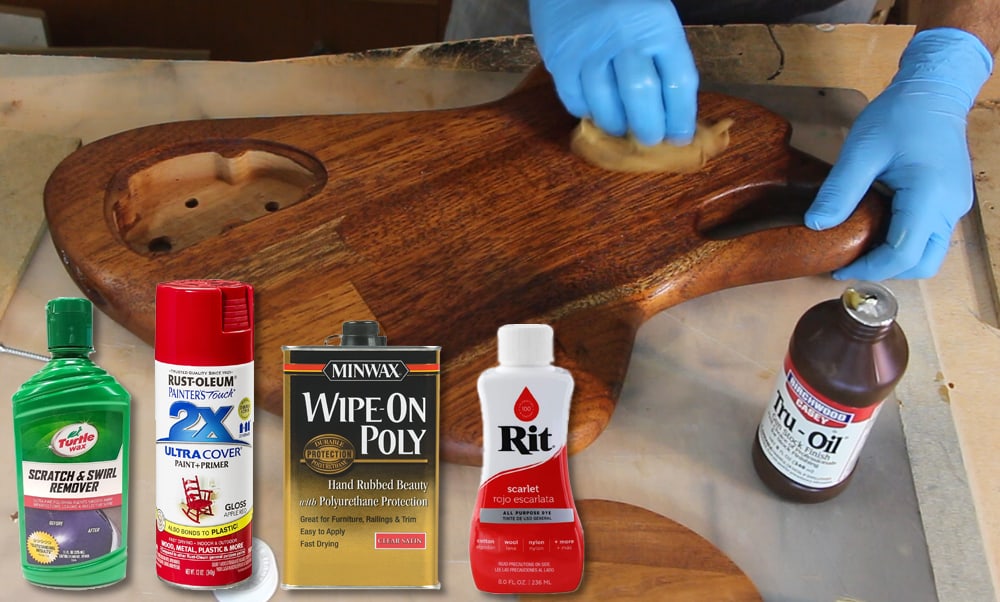
Ready for finishing
That’s it, the body of the Stratocaster is now ready for whichever finish you will want to give it. This can be clear coated, oil finish or color coated.
Variations
Ever since the raise of ‘super-Strats’ the iconic Stratocaster look has become a bit more flexible and even Fender’s custom shop ahs strayed from the original. These can mean variations of wood types or the shape of the pickguard, but can also mean breaking the famous 3 single coil pickups setup. Custom Fender Stratocasters can have different combinations of humbuckers and single coils. You may go for the Ibanez style, with neck and bridge humbuckers, and a single coil in the middle, or you may want an original combination. I am not even going to start with the number of combinations you can have when it comes to wiring, using hotter pickups or playing with faze switching. You can get many of these variations, pre-wired, with the pickguard.
These choices are all up to you and you can choose between a 60’s style replica or anything else you desire, Just make those decisions, and preferably get the hardware you need, before you start routing.